LLM Node
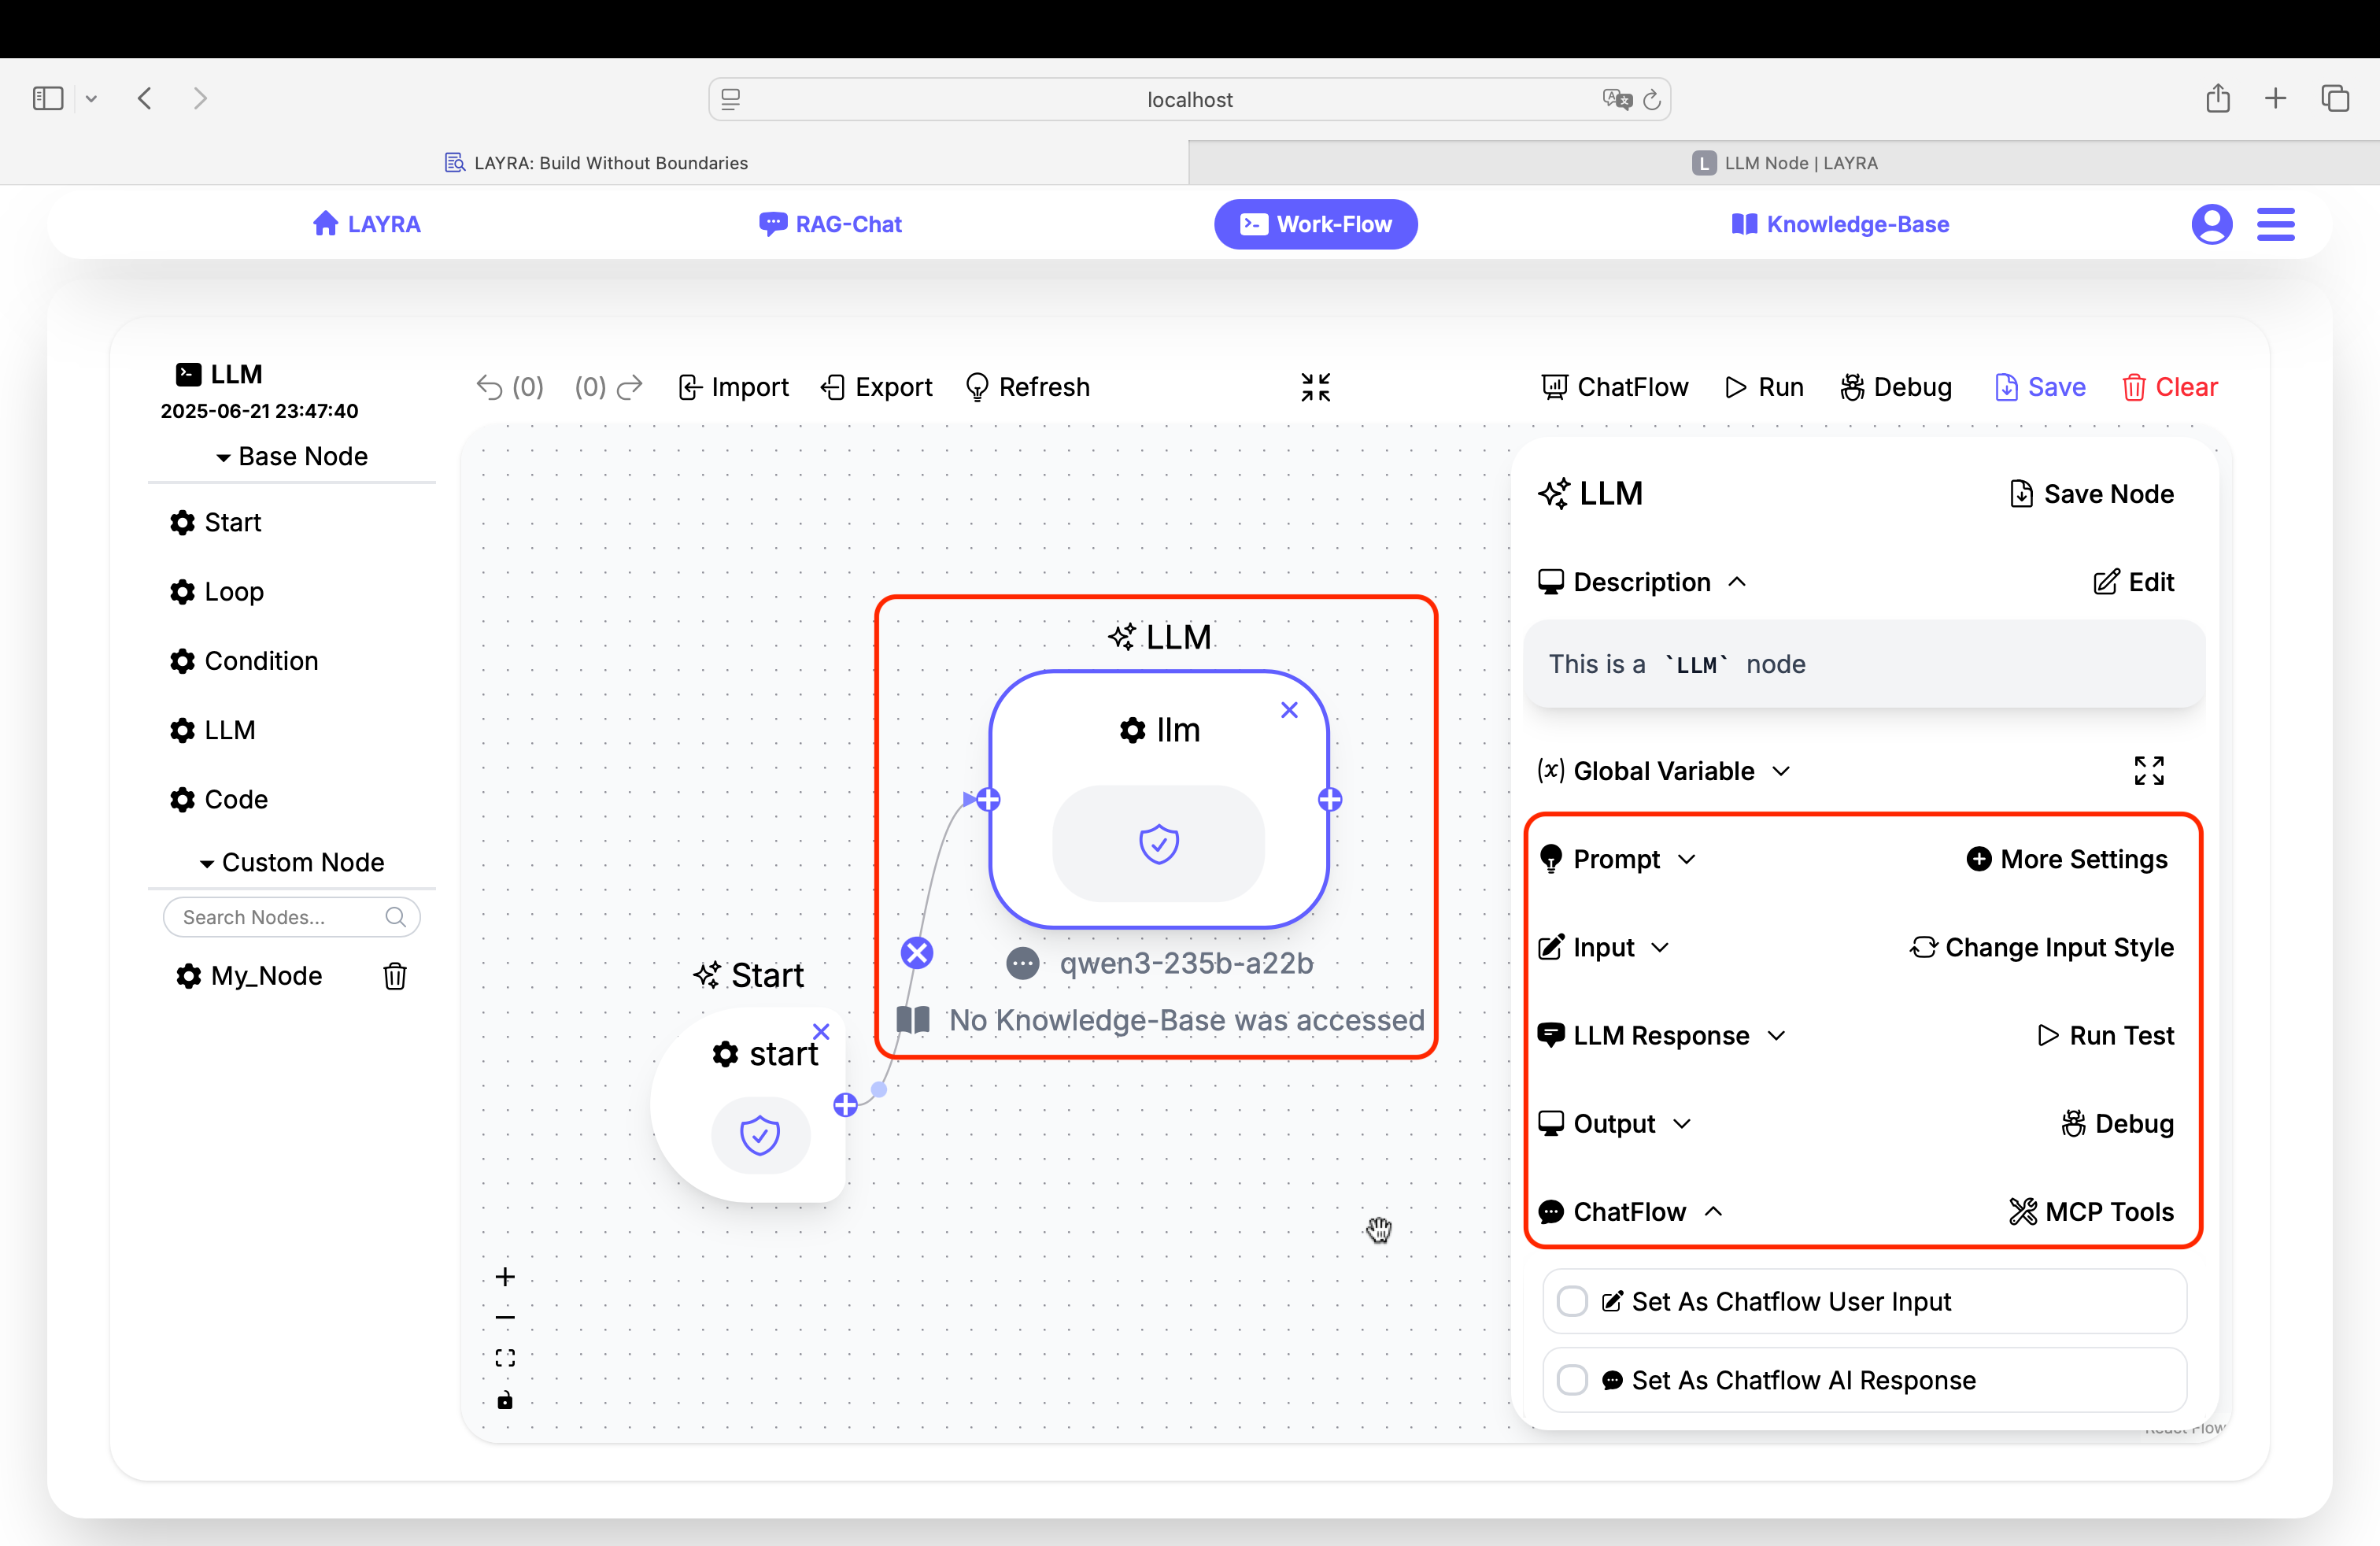
The LLM Node is the core component for integrating large language models into your workflows. It provides flexible interfaces to configure system prompts, inputs, and outputs while enabling seamless interaction with global variables, knowledge bases (RAG), external function calls (including MCP), and other advanced features.
Core Configuration Sections
1. Prompt Configuration
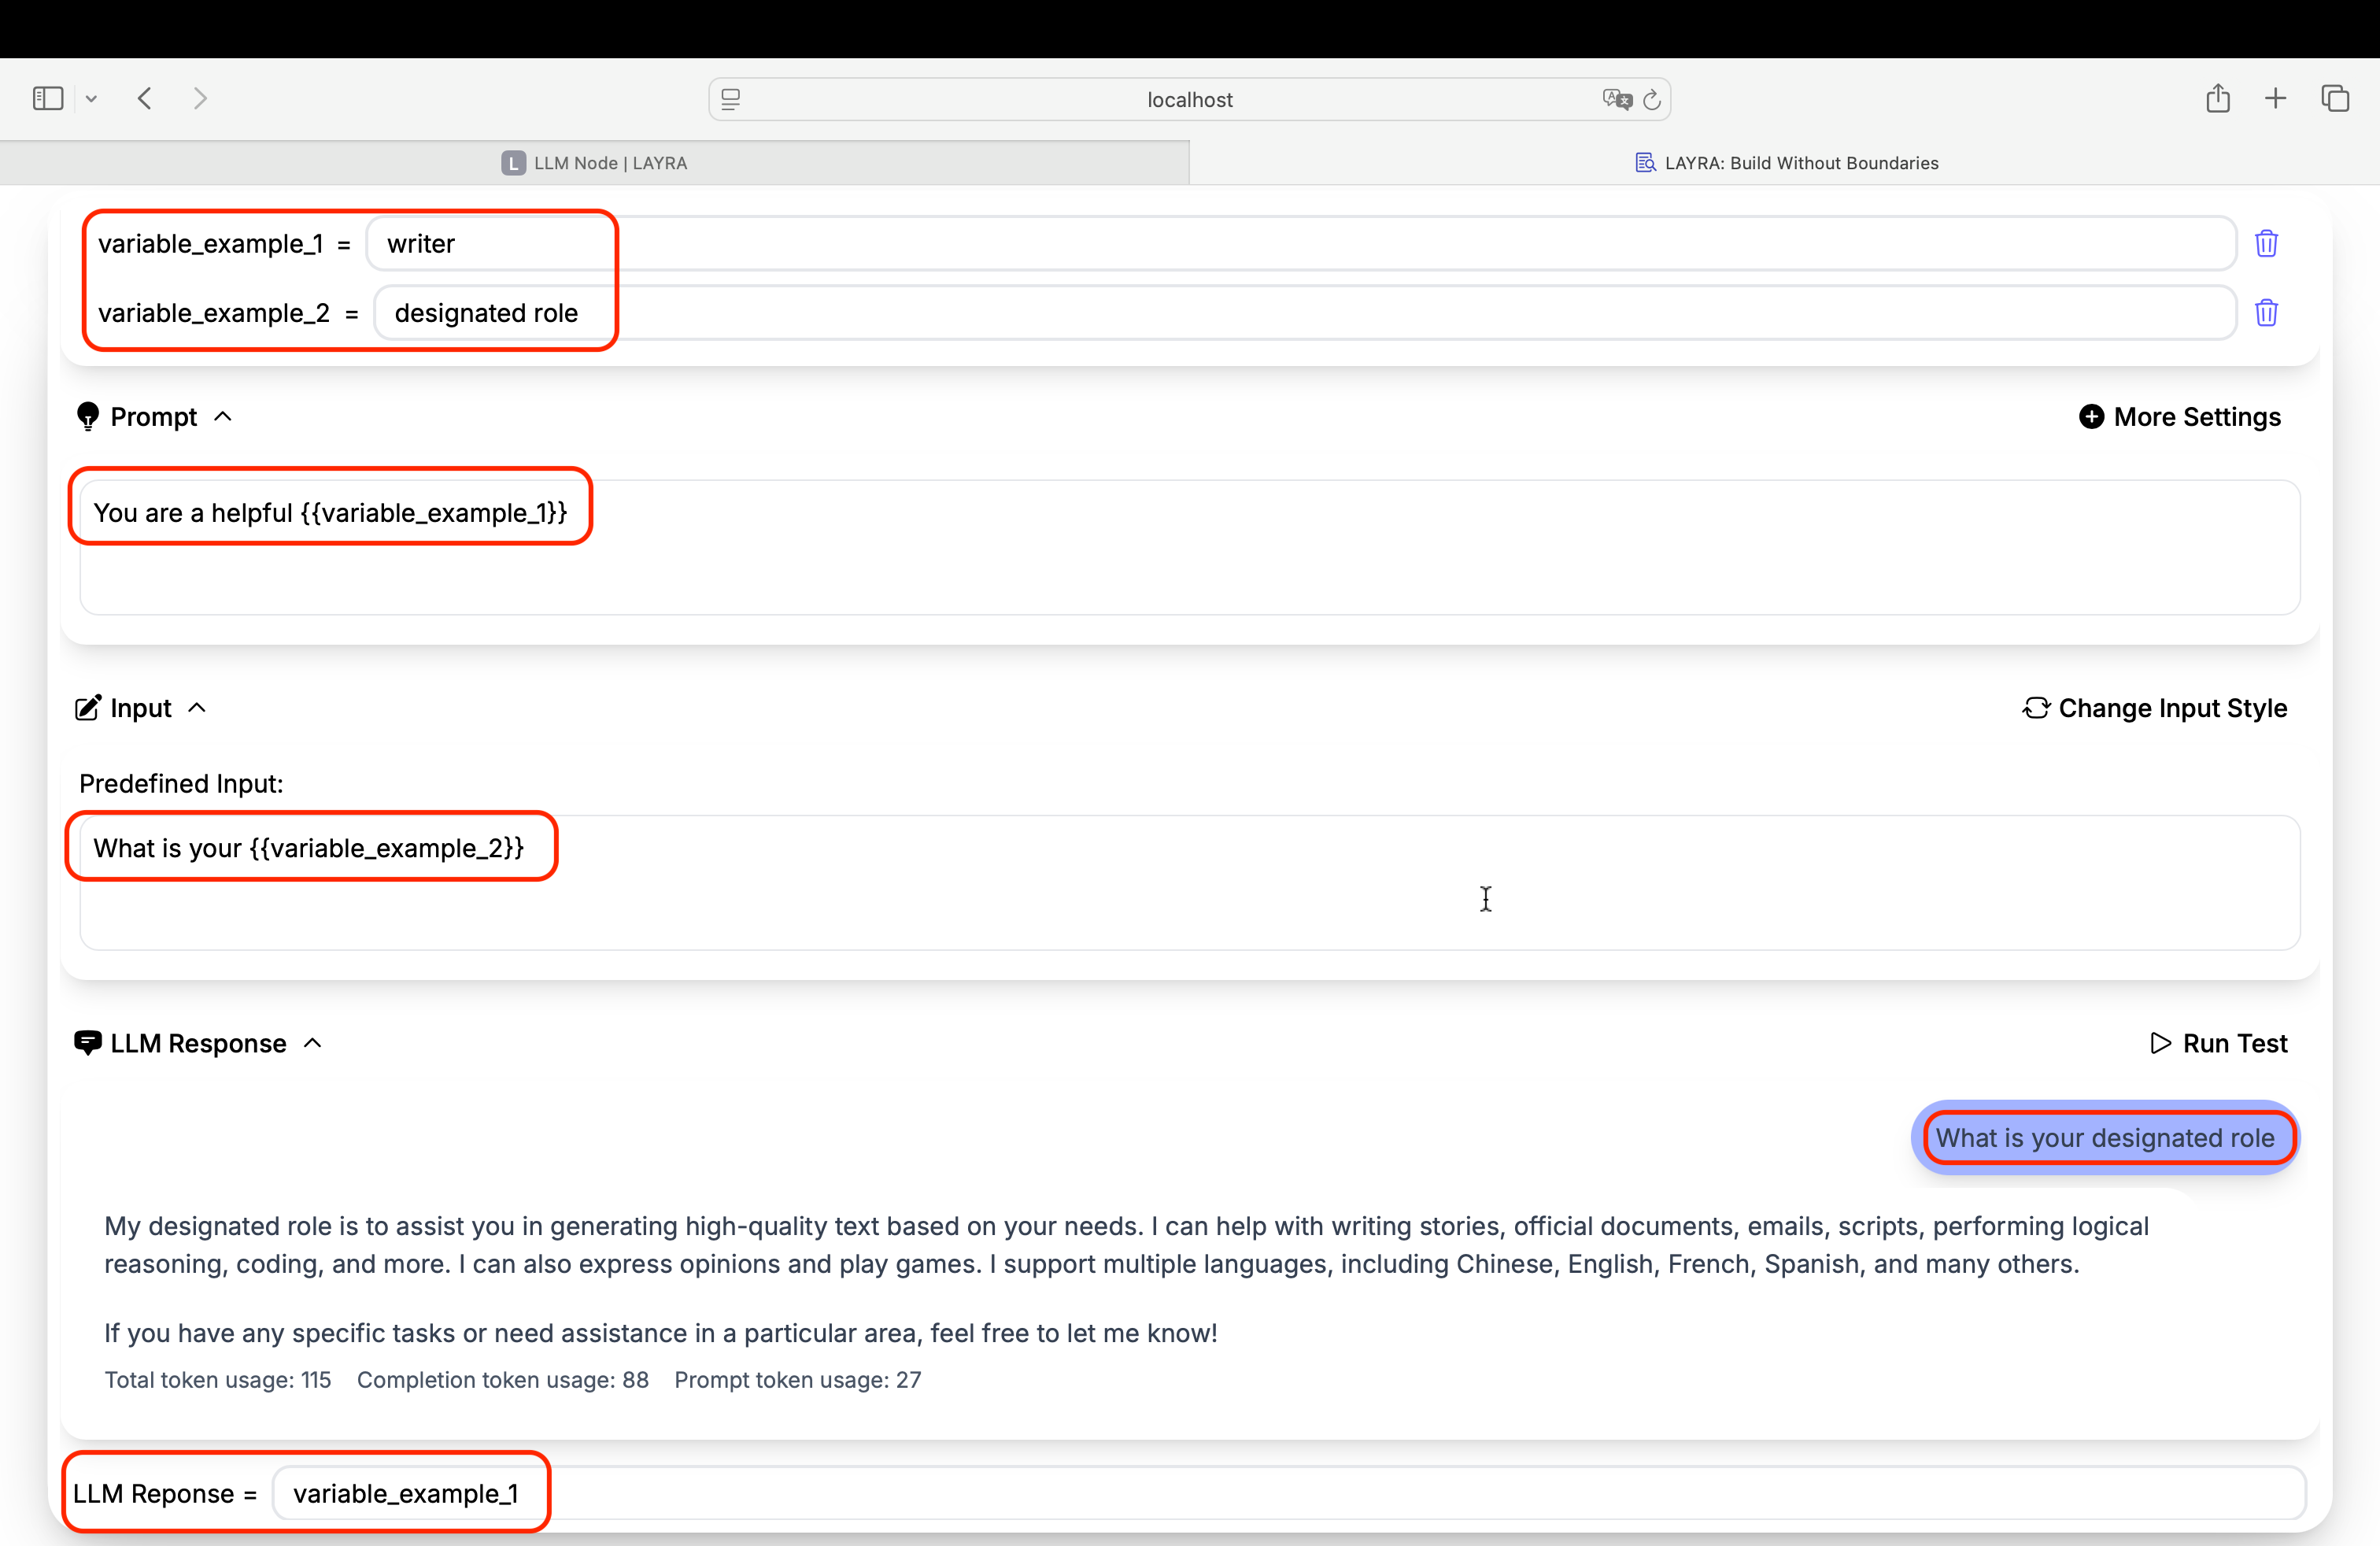
Defines the system prompt guiding the LLM's behavior. Supports dynamic variable insertion using {{variable}} syntax.
- Format: Plain text with optional variable placeholders
- Variable Handling: Automatically replaces
{{variable}}with values from Global Variables - Advanced Settings (via More Settings):
- Model selection
- LLM parameters (temperature, max tokens, top-P, etc.)
- Knowledge base RAG integration
Refer to RAG-Chat for implementation details.
2. Input Configuration
Determines the LLM's input source with two operational modes:
Predefined Input
- Fixed input defined during workflow design
- Supports
{{variable}}syntax for Global Variables - Executes workflow without user interruption
- Activated via
Change Input Style
ChatFlow User Input
- Pauses workflow execution at this node
- Presents interactive dialog for real-time user input (Human-In-The-Loop)
- Activated via
Change Input Style
3. LLM Response
Processes and displays model outputs with these features:
- Markdown Rendering: Formatted display including URL/base64 images
- JSON Extraction:
Automatically detects and extracts JSON objects using regex. Supports multiple JSON structures in outputs. Valid JSON pairs with Global Variables for assignment.
# Example
{"variable": "value"} → Updates global variable - Run Test: Execute node independently
- Response Assignment:
- Dropdown lists all Global Variables
- Assigns full response to selected variable
Works parallel with JSON Extraction
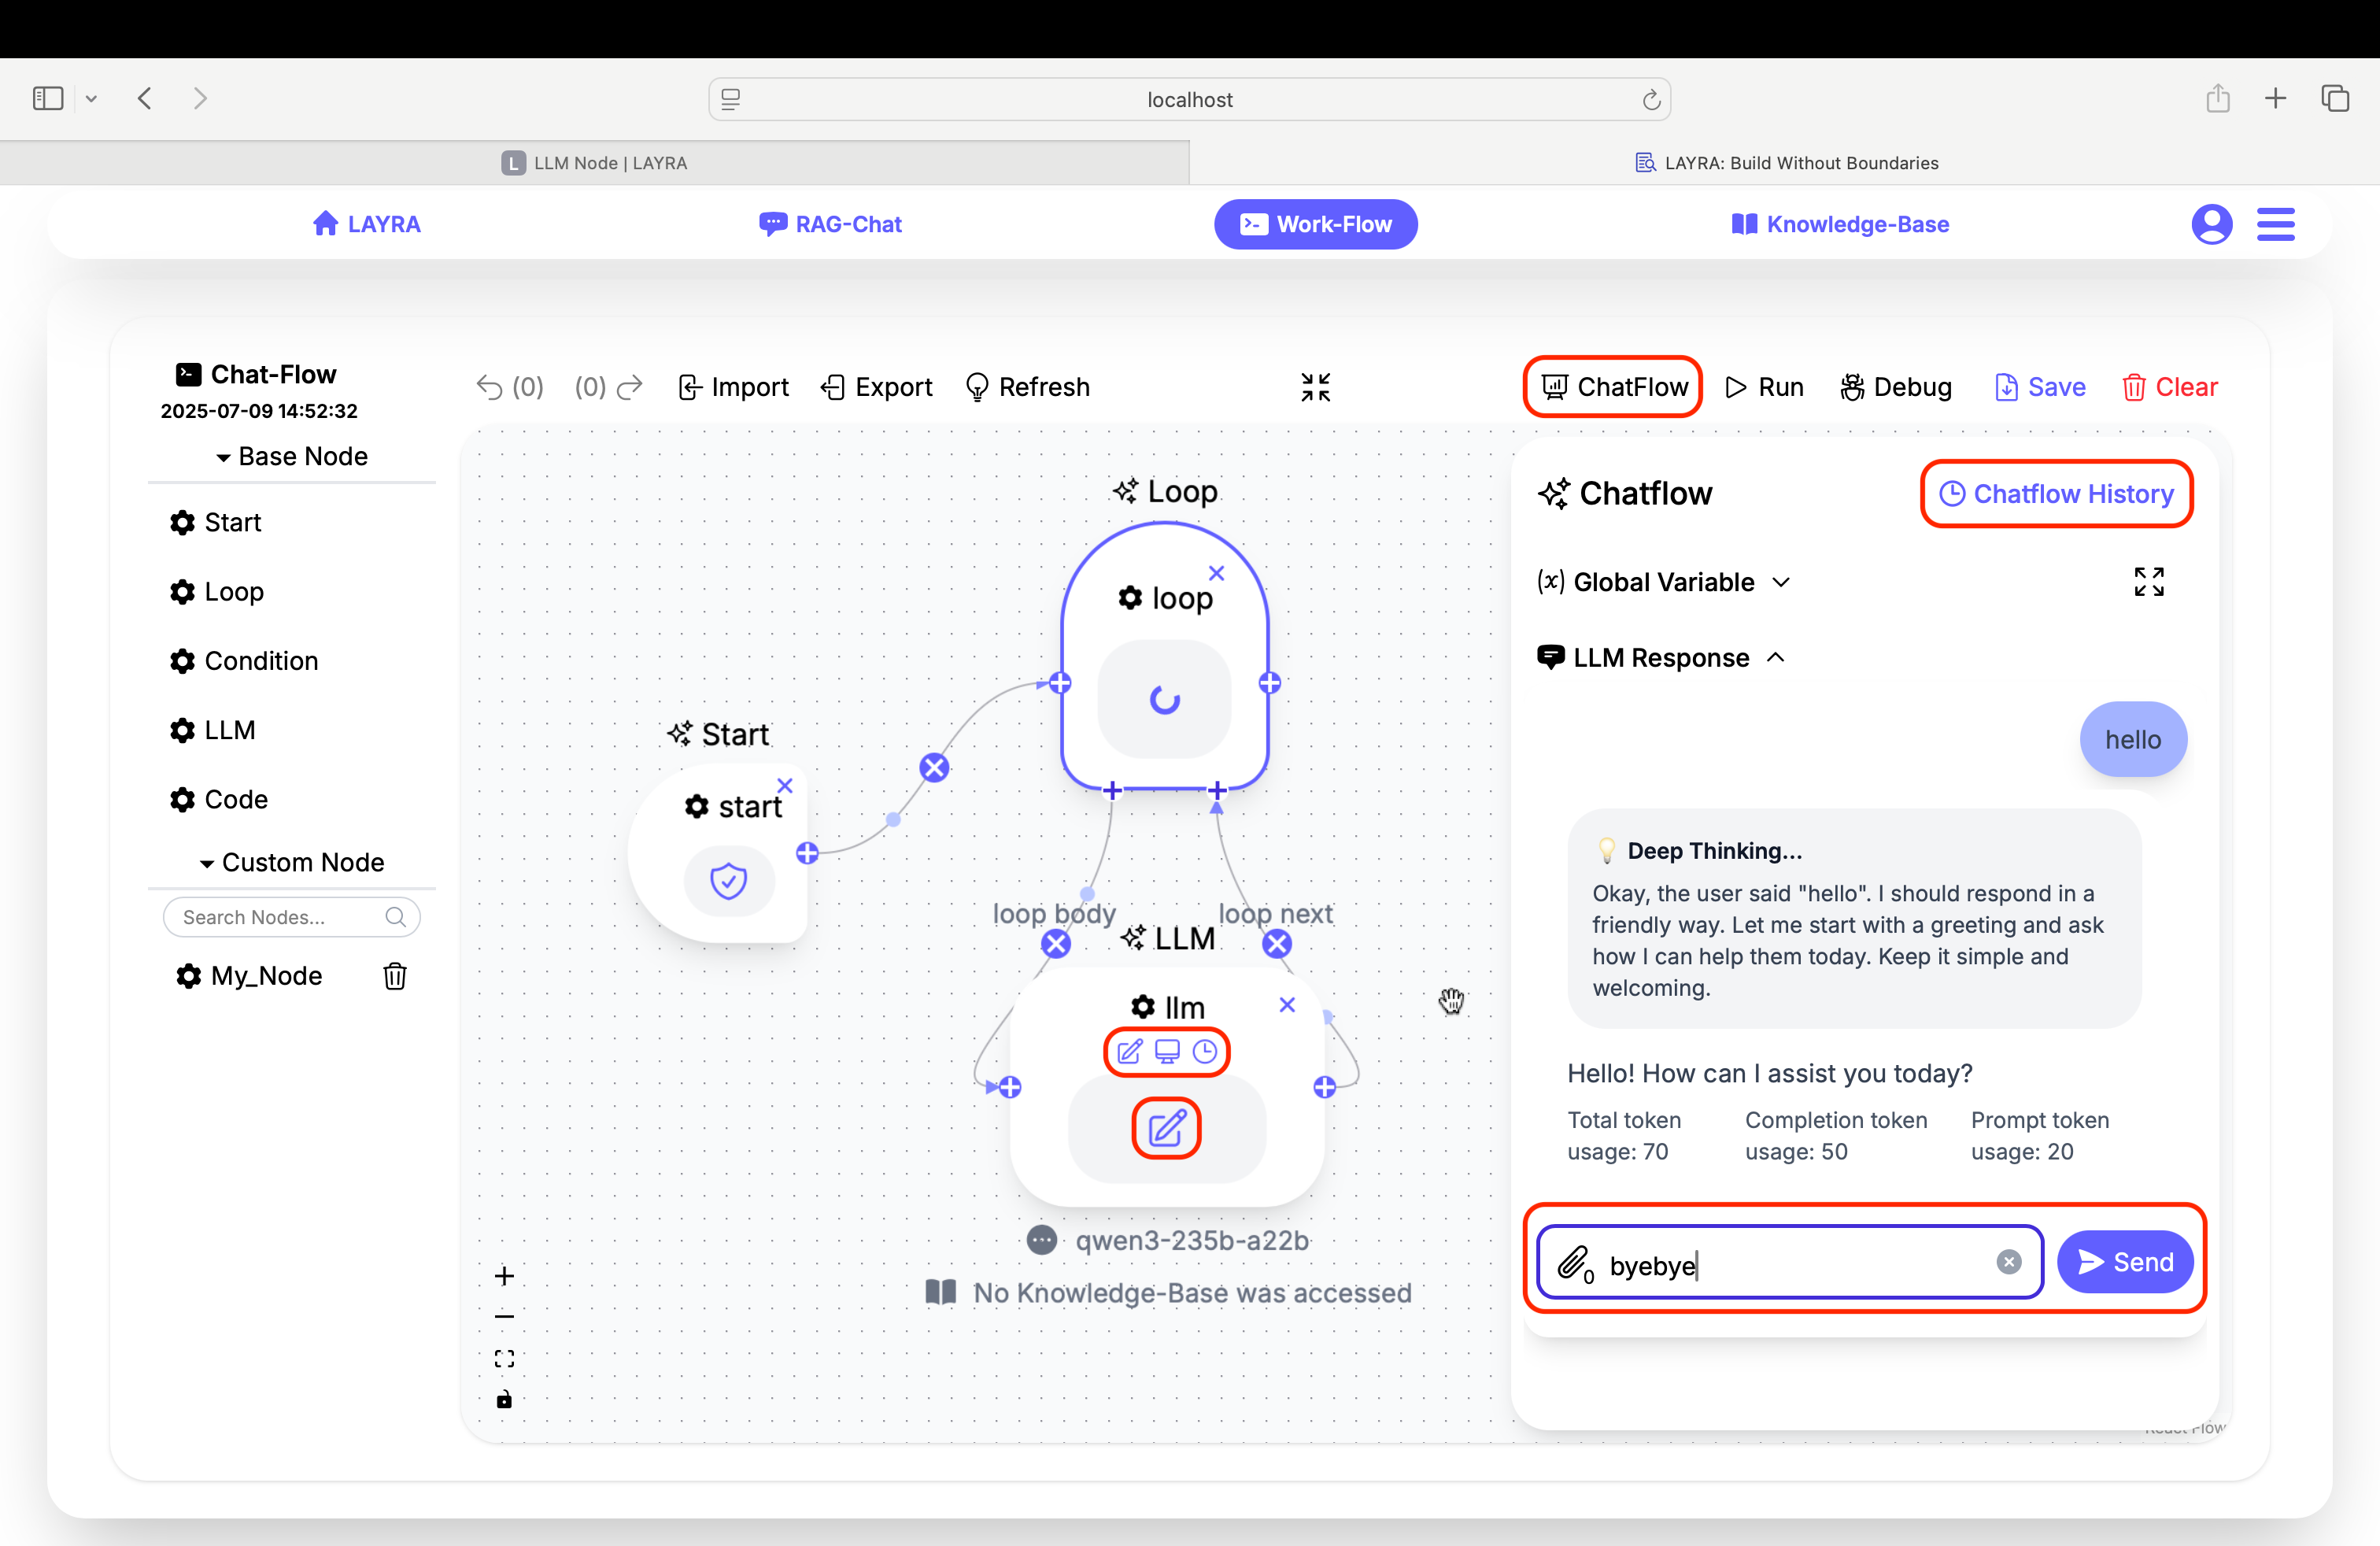
4. ChatFlow Controls
The ChatFlow module is essential in LAYRA workflows, enabling you to interrupt execution at any point for manual input (e.g., activating human-in-the-loop for intervention) while selectively displaying LLM outputs and hiding backend processes such as reasoning or text handling.
Three checkboxes governing conversation flow:
| Checkbox | Function | Dependencies |
|---|---|---|
| Set As Chatflow User Input | Marks node as user input | Auto-enables user input mode |
| Set As Chatflow AI Response | Marks node as AI output | Required for Memory feature |
| Use Conversation Memory | Maintains chat history | Requires AI Response checkbox |
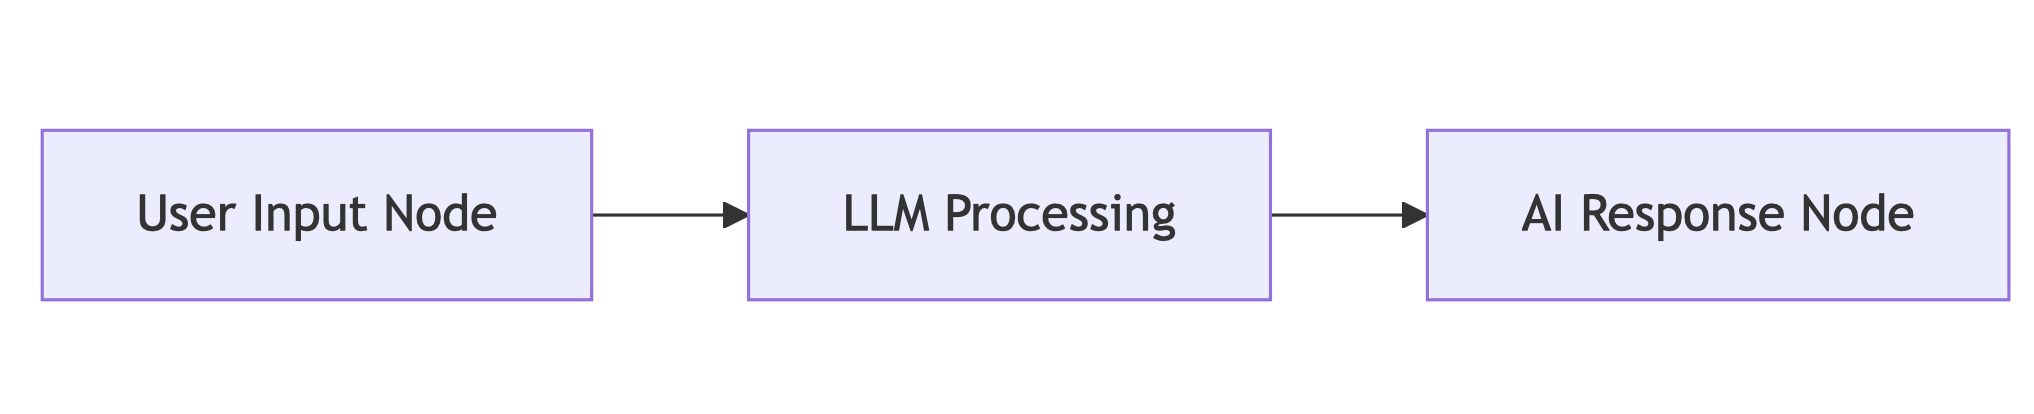
When enabling User Input, AI Response, Conversation Memory, or MCP Support, corresponding icons appear on canvas nodes.
-
User Input Nodes:
EnableUser Inputto pause workflow execution and display an interactive input dialog in ChatFlow. Nodes withPredefined Inputrun in the background using preset values. View detailed input/output via the node'sLLM ResponseandOutputpanels. -
AI Response Nodes:
EnableAI Responseto display model outputs in the ChatFlow dialog. Disabled nodes run in the background – checkLLM ResponseandOutputpanels for details. -
Conversation Memory:
Enable to retain chat history across sessions. Disabling treats eachUser Inputas a new conversation.
Access historical ChatFlow runs via the top-right
Chatflow Historybutton. This only includes conversations whereUser Input/AI Responsefeatures were enabled.
Each User Input node must be followed by a corresponding AI Response node to maintain conversational flow. The system will flag errors for:
- Consecutive
User Inputnodes - Consecutive
AI Responsenodes
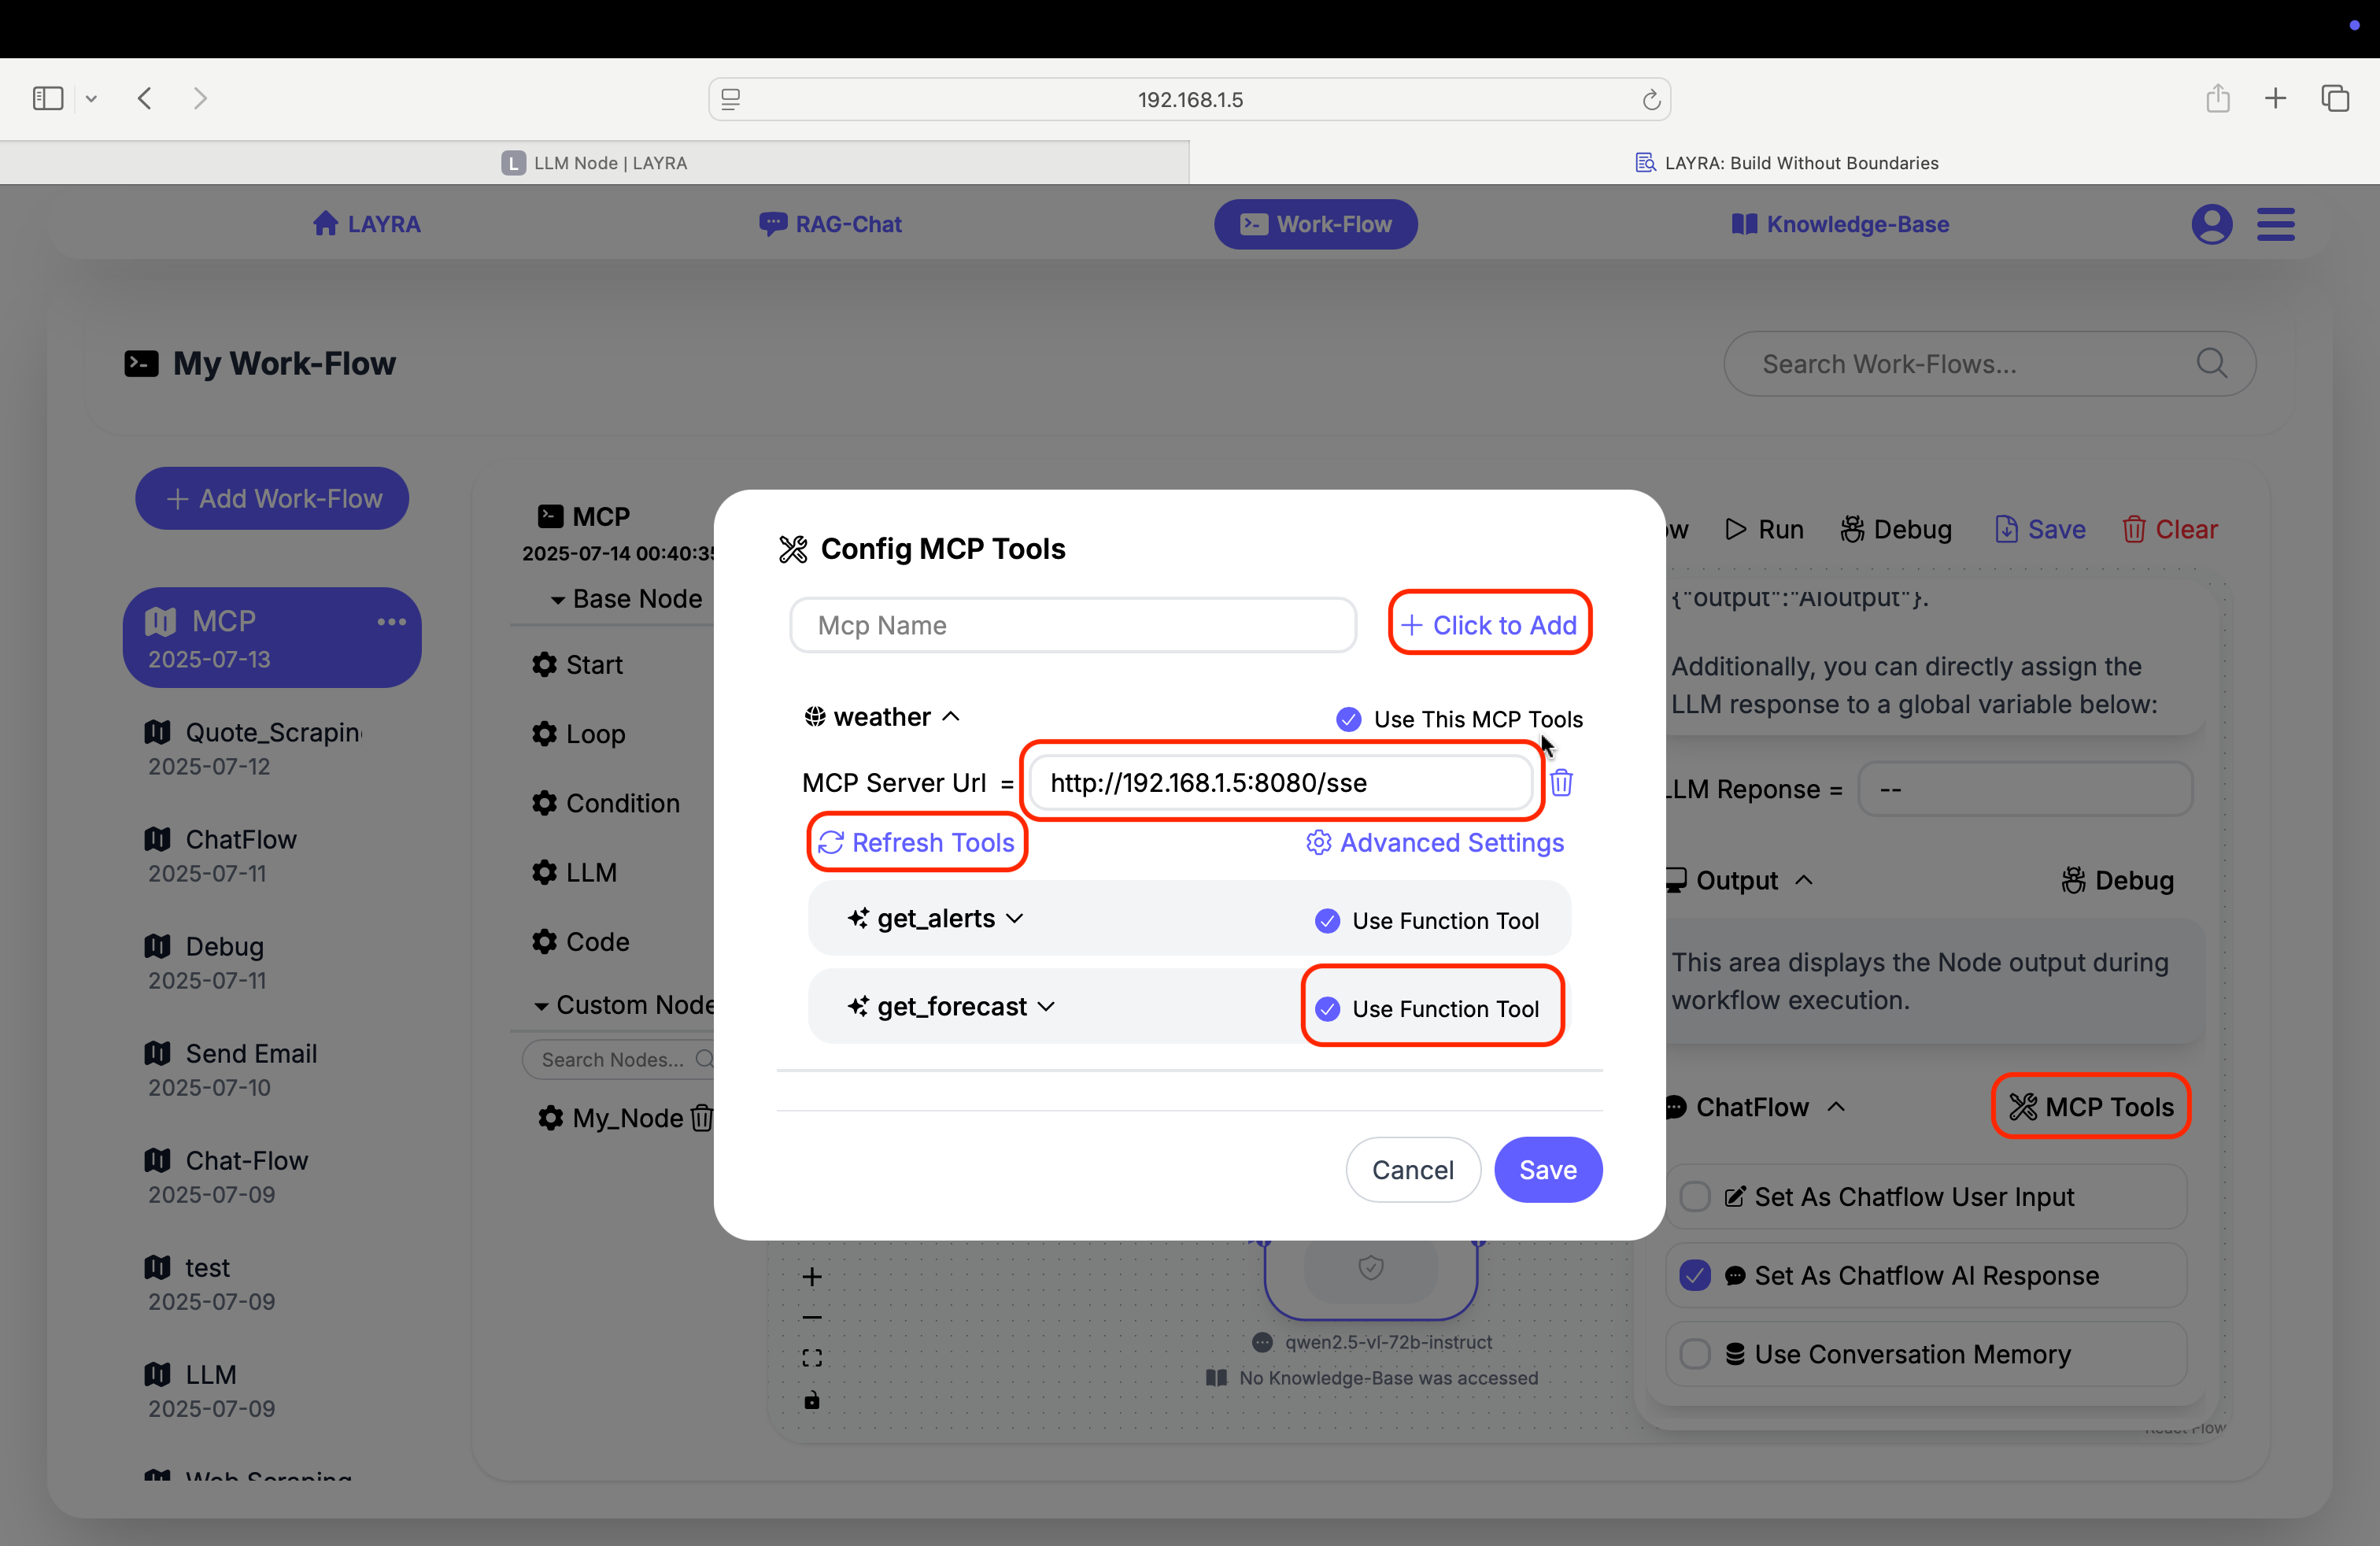
5. MCP Support
Click the MCP Tools button in the top-right corner of the ChatFlow configuration panel to set up MCP servers. LAYRA supports SSE-streaming MCP services with simple configuration:
- Enter
MCP Nameand clickClick to Addto create server - Input SSE endpoint URL in
MCP Server Url - Use
Refresh Toolsto load available tools - Activate services:
- Toggle
Use This MCP Toolsfor full service activation - Check
Use Function Toolper tool for granular control
- Toggle
Once activated, LLMs automatically invoke tools during conversations. Multiple MCP servers can be configured per LLM node.
We recommend disabling the LLM's thinking mode when using MCP, as the backend activates built-in reasoning modules during tool invocation.
When using a locally hosted MCP server:
- Set the
MCP Server Urlto your machine's Internal IP Address (e.g.,http://192.168.1.5:8000/sseorhttp://10.0.0.2:5000/sse), notlocalhost:5000/sse. - Firewall Configuration: If you're using a firewall (e.g.,
ufw), allow Docker network access to your MCP server port. - Service Binding: Ensure your MCP service binds to
0.0.0.0(all interfaces), not127.0.0.1(localhost only).
6. MCP Advanced Settings
You can also configure Headers and Timeout Settings in Advanced Settings. For instance, enabling LLM nodes to access RAGFLOW's external knowledge base requires configuring the api_key in the headers.

ChatFlow Mechanics
We demonstrate ChatFlow Mechanics through a simple workflow containing three LLM nodes:
- The first LLM node handles user input
- The second translates the first node's English output into Chinese
- The third node outputs the second node's Chinese translation
In the ChatFlow interface, only the user's English input and final Chinese output are visible. The first node's output, third node's input, and the entire second node operate in the background.
Basic ChatFlow Example
- Only input/output nodes appear in the ChatFlow UI
- Intermediate processing remains hidden
Conversation Memory Setup
-
Requirements:
- Paired input/output nodes
- "Use Conversation Memory" enabled on output nodes
-
Validation:
- Blocks consecutive input nodes
- Prevents orphaned output nodes
This example also has the memory feature enabled:
Variable Configuration Guide
1. Basic Prompt with Variables
- Create global variable:
topic = "climate change" - Configure prompt:
As a science expert, explain {{topic}} in simple terms. - Set input style: Predefined Input (
What are key impacts?)
2. Interactive User Input
- Enable Set As Chatflow User Input
- Configure prompt:
As a travel assistant, always provide helpful responses.
3. Output Capture Methods
3.1 JSON Output Processing
- Prompt configuration:
Output JSON: {destination, duration, budget}
Example: {"destination": "Paris", "duration": 7, "budget": 2500} - LLM output:
{ "destination": "Kyoto", "duration": 10, "budget": 3200 } - Automatically updates variables in Global Variables:
destination = "Kyoto"duration = 10budget = 3200
3.2 Manual Assignment
Select variable in LLM Response= dropdown → Full response stored
- ⚠️ "Consecutive input nodes without output"
- ⚠️ "Output node without preceding input"
- ⚠️ "Memory enabled without AI Response designation"
- ⚠️ "Using
Predefined Inputwithout defining content"
Implementation Example: Web Scraping + Email Automation
Let’s walk through a practical example of combining LLM nodes with code nodes in a workflow to create a simple automation: scraping quotes from a website, filtering them by a user-specified theme using a large language model, and sending the selected quotes via email.
This example involves four functional nodes plus an additional code node to install required pip dependencies.
In this workflow, there is a single human intervention step: specifying the desired quote theme before the LLM generates the email content. Therefore:
- The email generation node needs to enable the
User Inputfeature. - Before that, we add a
codenode to scrape a large number of quotes for the LLM to filter. - After the LLM processes the data, another
codenode sends the email. - Finally, we add an LLM output node with
AI Responseenabled at the end of the workflow to display the sent email content directly in the Chatflow for improved user experience.
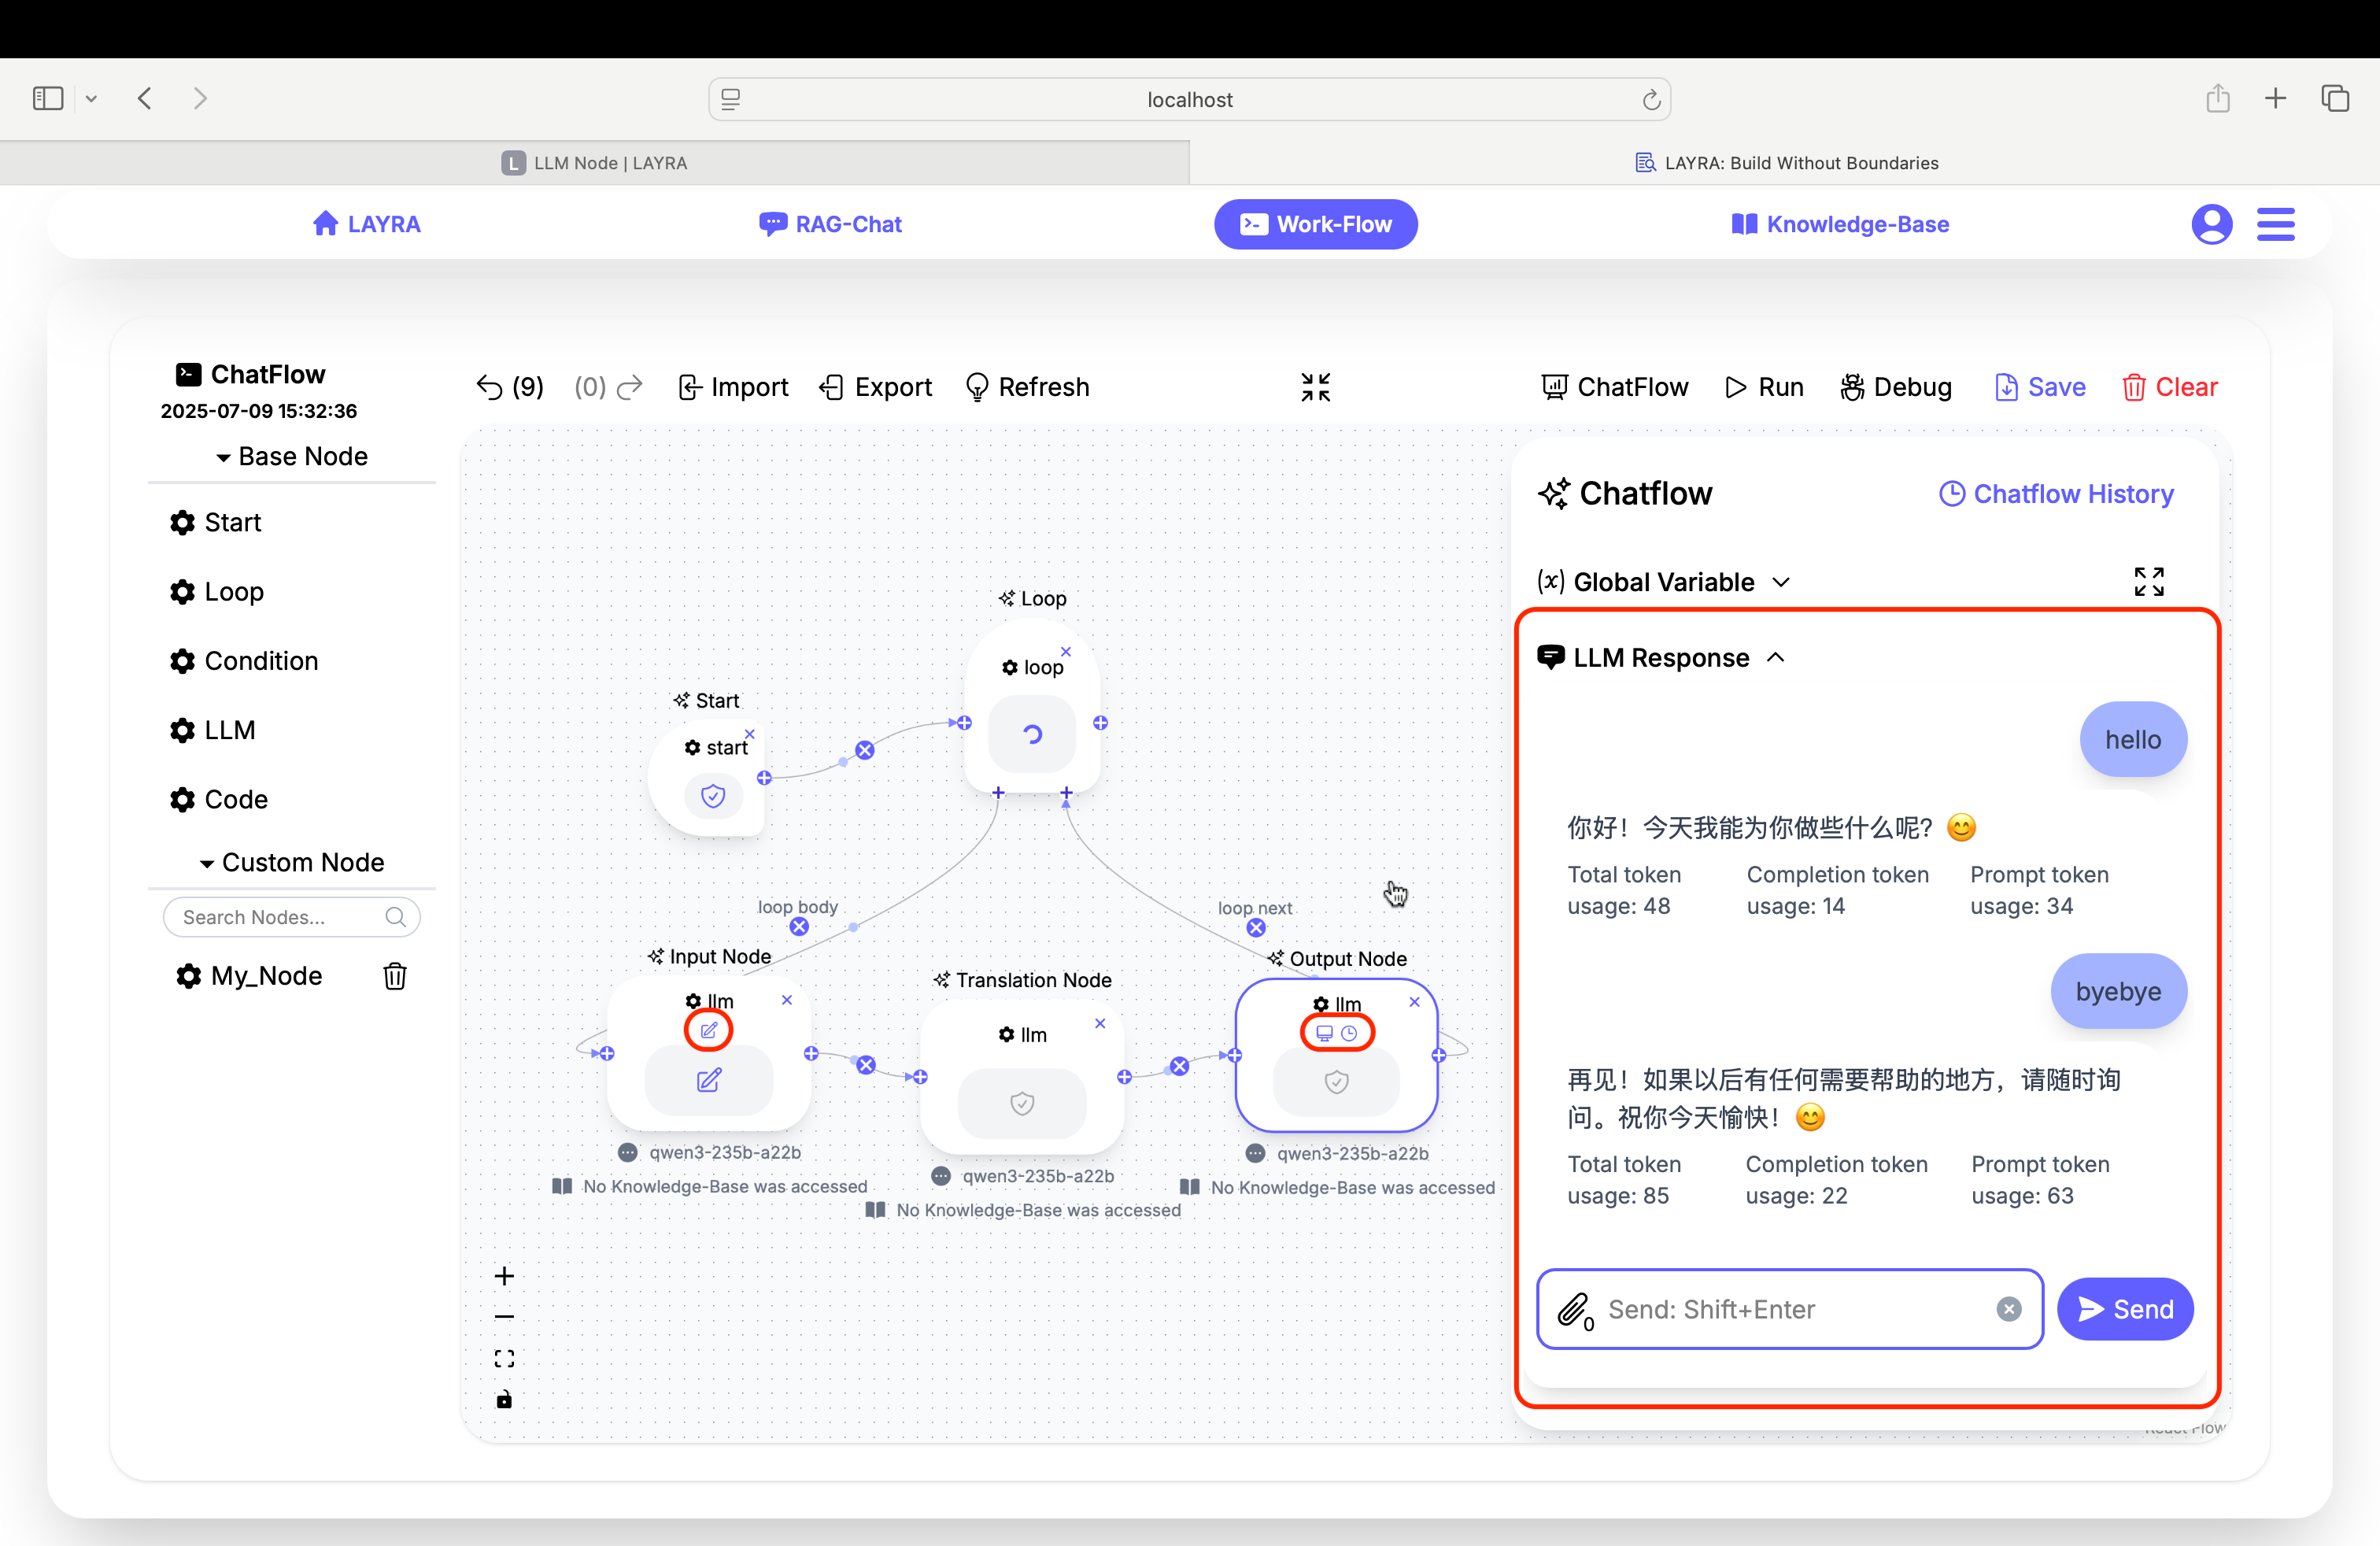
1. Global Variable Configuration
As shown above, first define all necessary Global Variables:
Before proceeding, you must authorize LAYRA to send emails using an Authorization Code. Refer to the Code Node Section for instructions, or ask the LLM directly for guidance.
quotes_url = "https://quotes.toscrape.com" # The website to scrape quotes from

quotes = "" # Initially empty; will be populated by the scraping node

recipient_name = "Your Name" # Replace with the recipient's name

recipient_email = "recipient@example.com" # Replace with the recipient's email

sender_name = "LAYRA" # Replace with the sender's name

sender_email = "sender@example.com" # Replace with the sender's email

authorization_code = "Your Code" # Replace with the sender's Authorization Code

email_subject = "" # Initially empty; generated by the LLM

email_body = "" # Initially empty; generated by the LLM
Often, you do not need to define all Global Variables at the start. Instead, add or remove variables as your workflow logic evolves.
2. Node Configuration
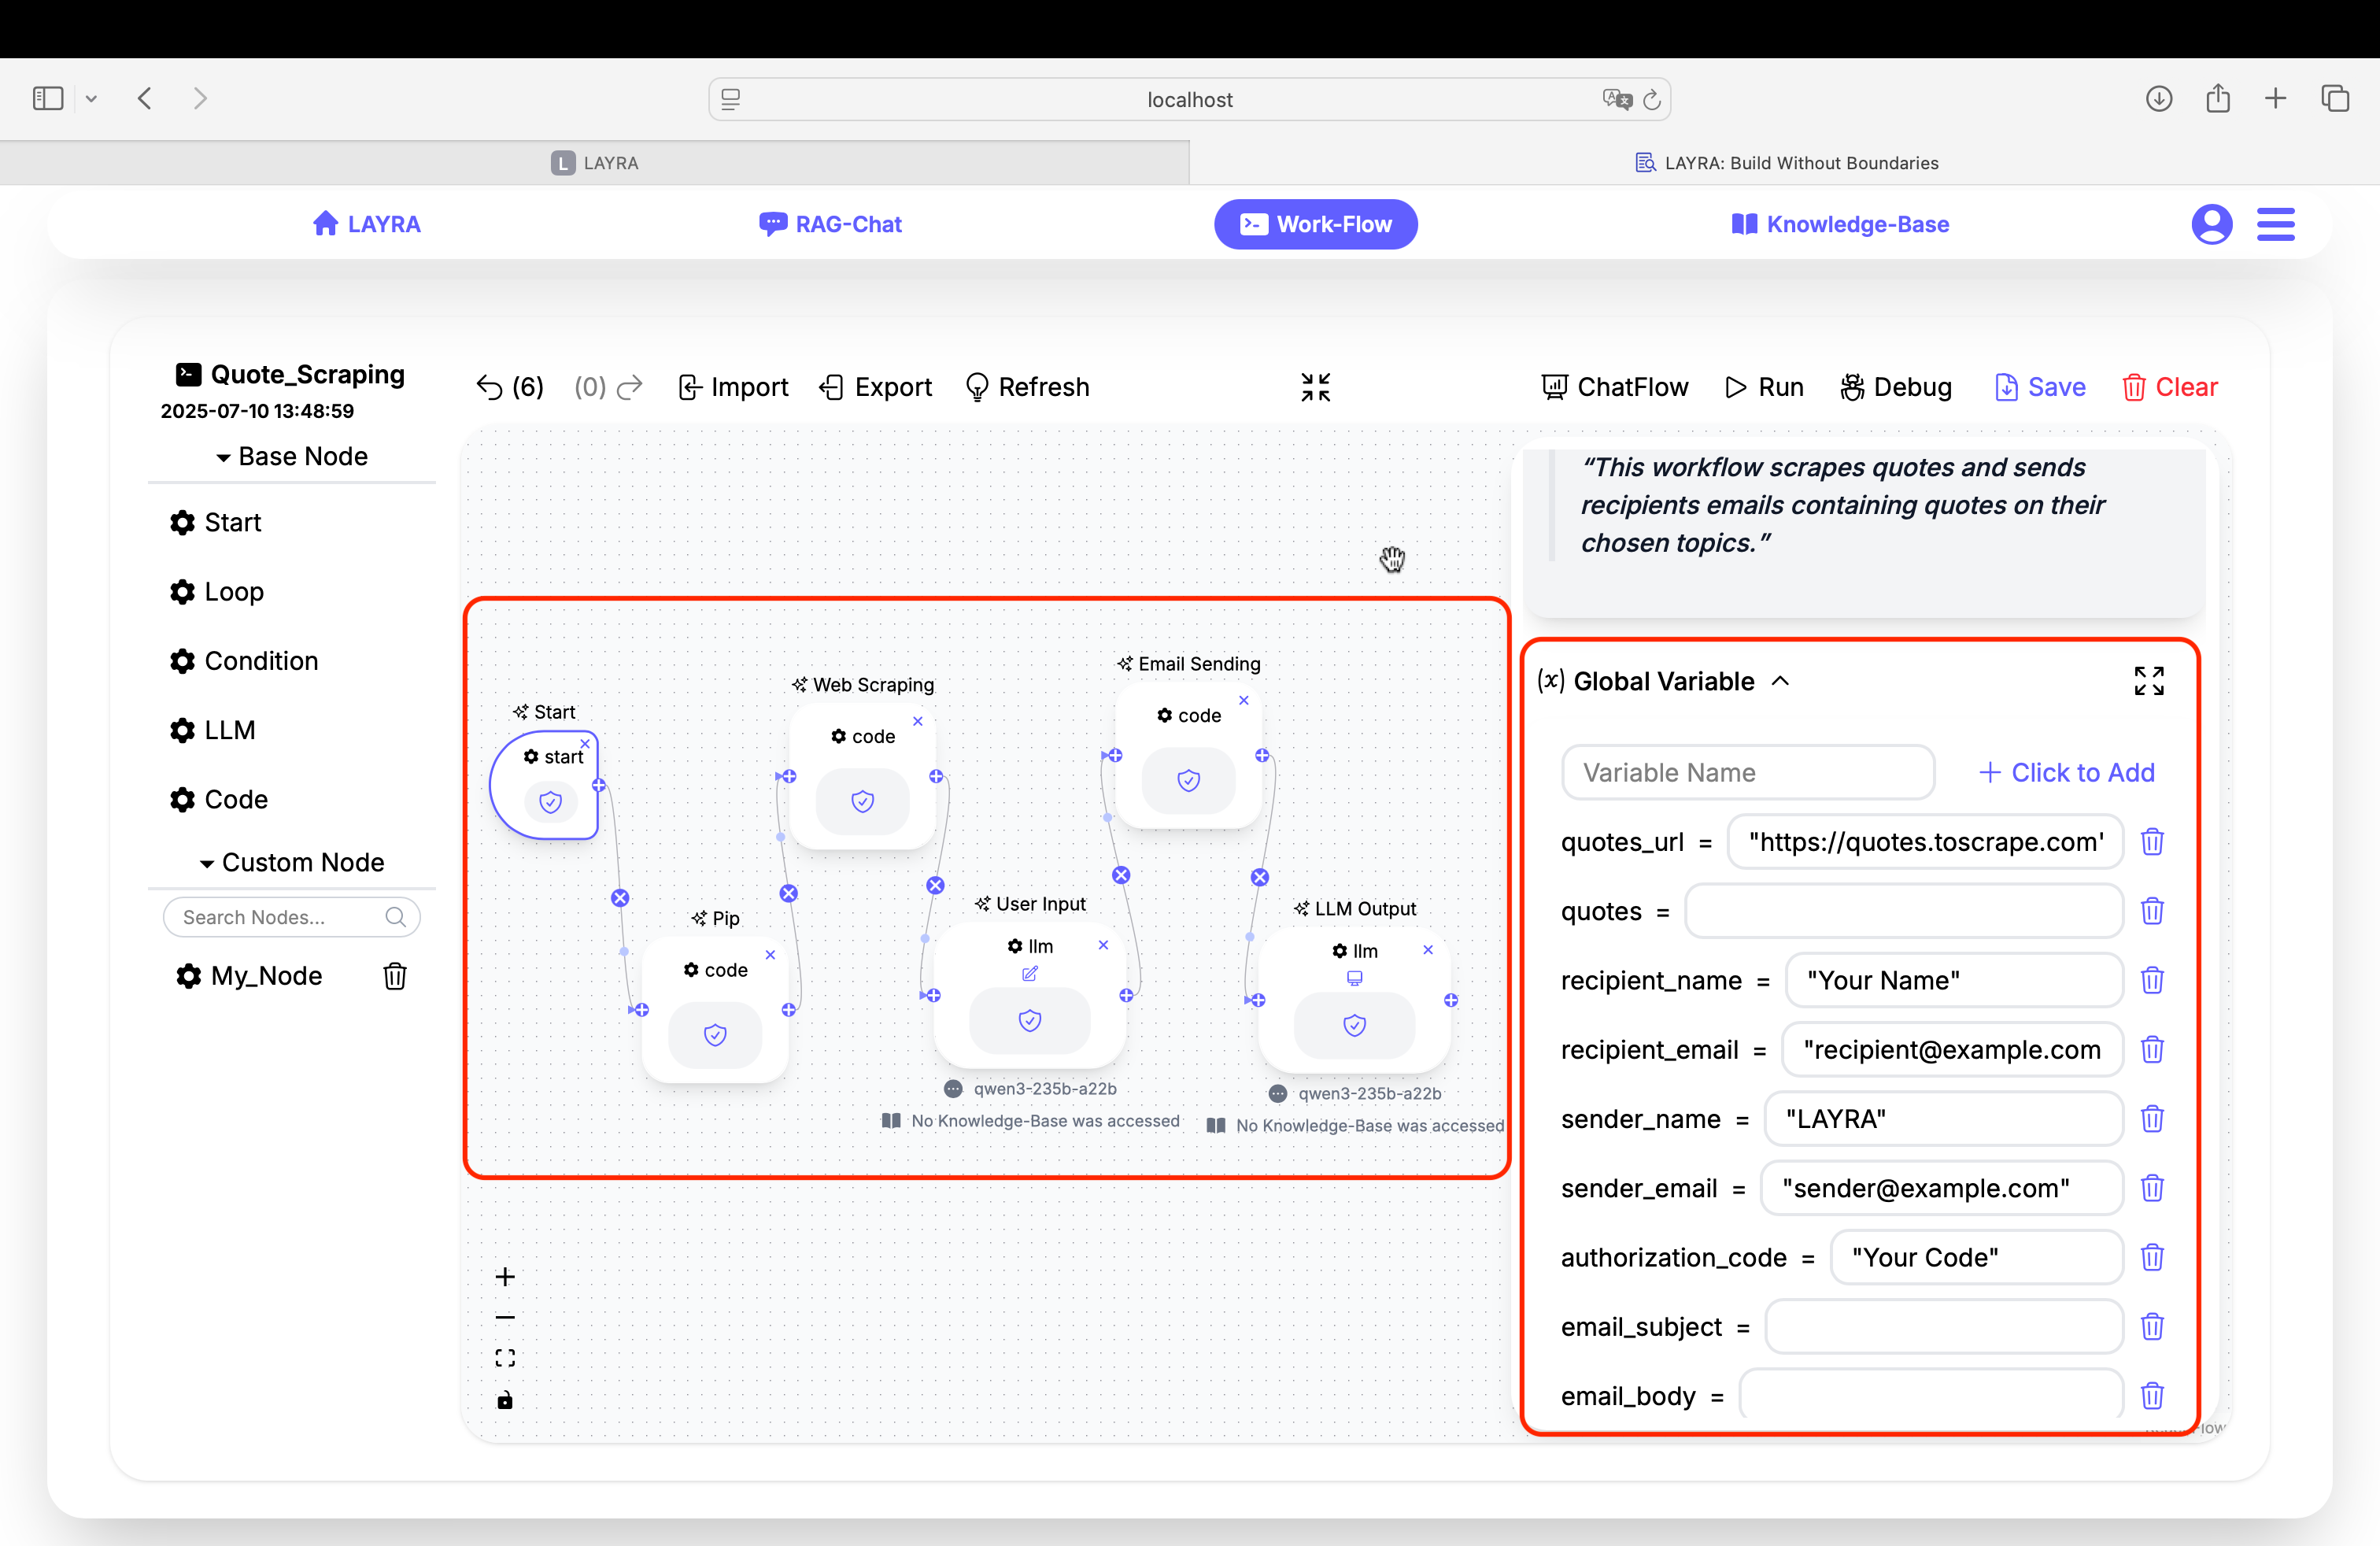
1. Pip Dependencies Node
Modify the Pip Dependencies field to include:
beautifulsoup4
requests == 2.26.0
If you are located in China and need to accelerate downloads, set a pip mirror:
Mirror Url = https://pypi.tuna.tsinghua.edu.cn/simple
Check Commit Runtime Environment to persist your pip mirror and dependencies, avoiding the need for a separate pip installation node in future runs.
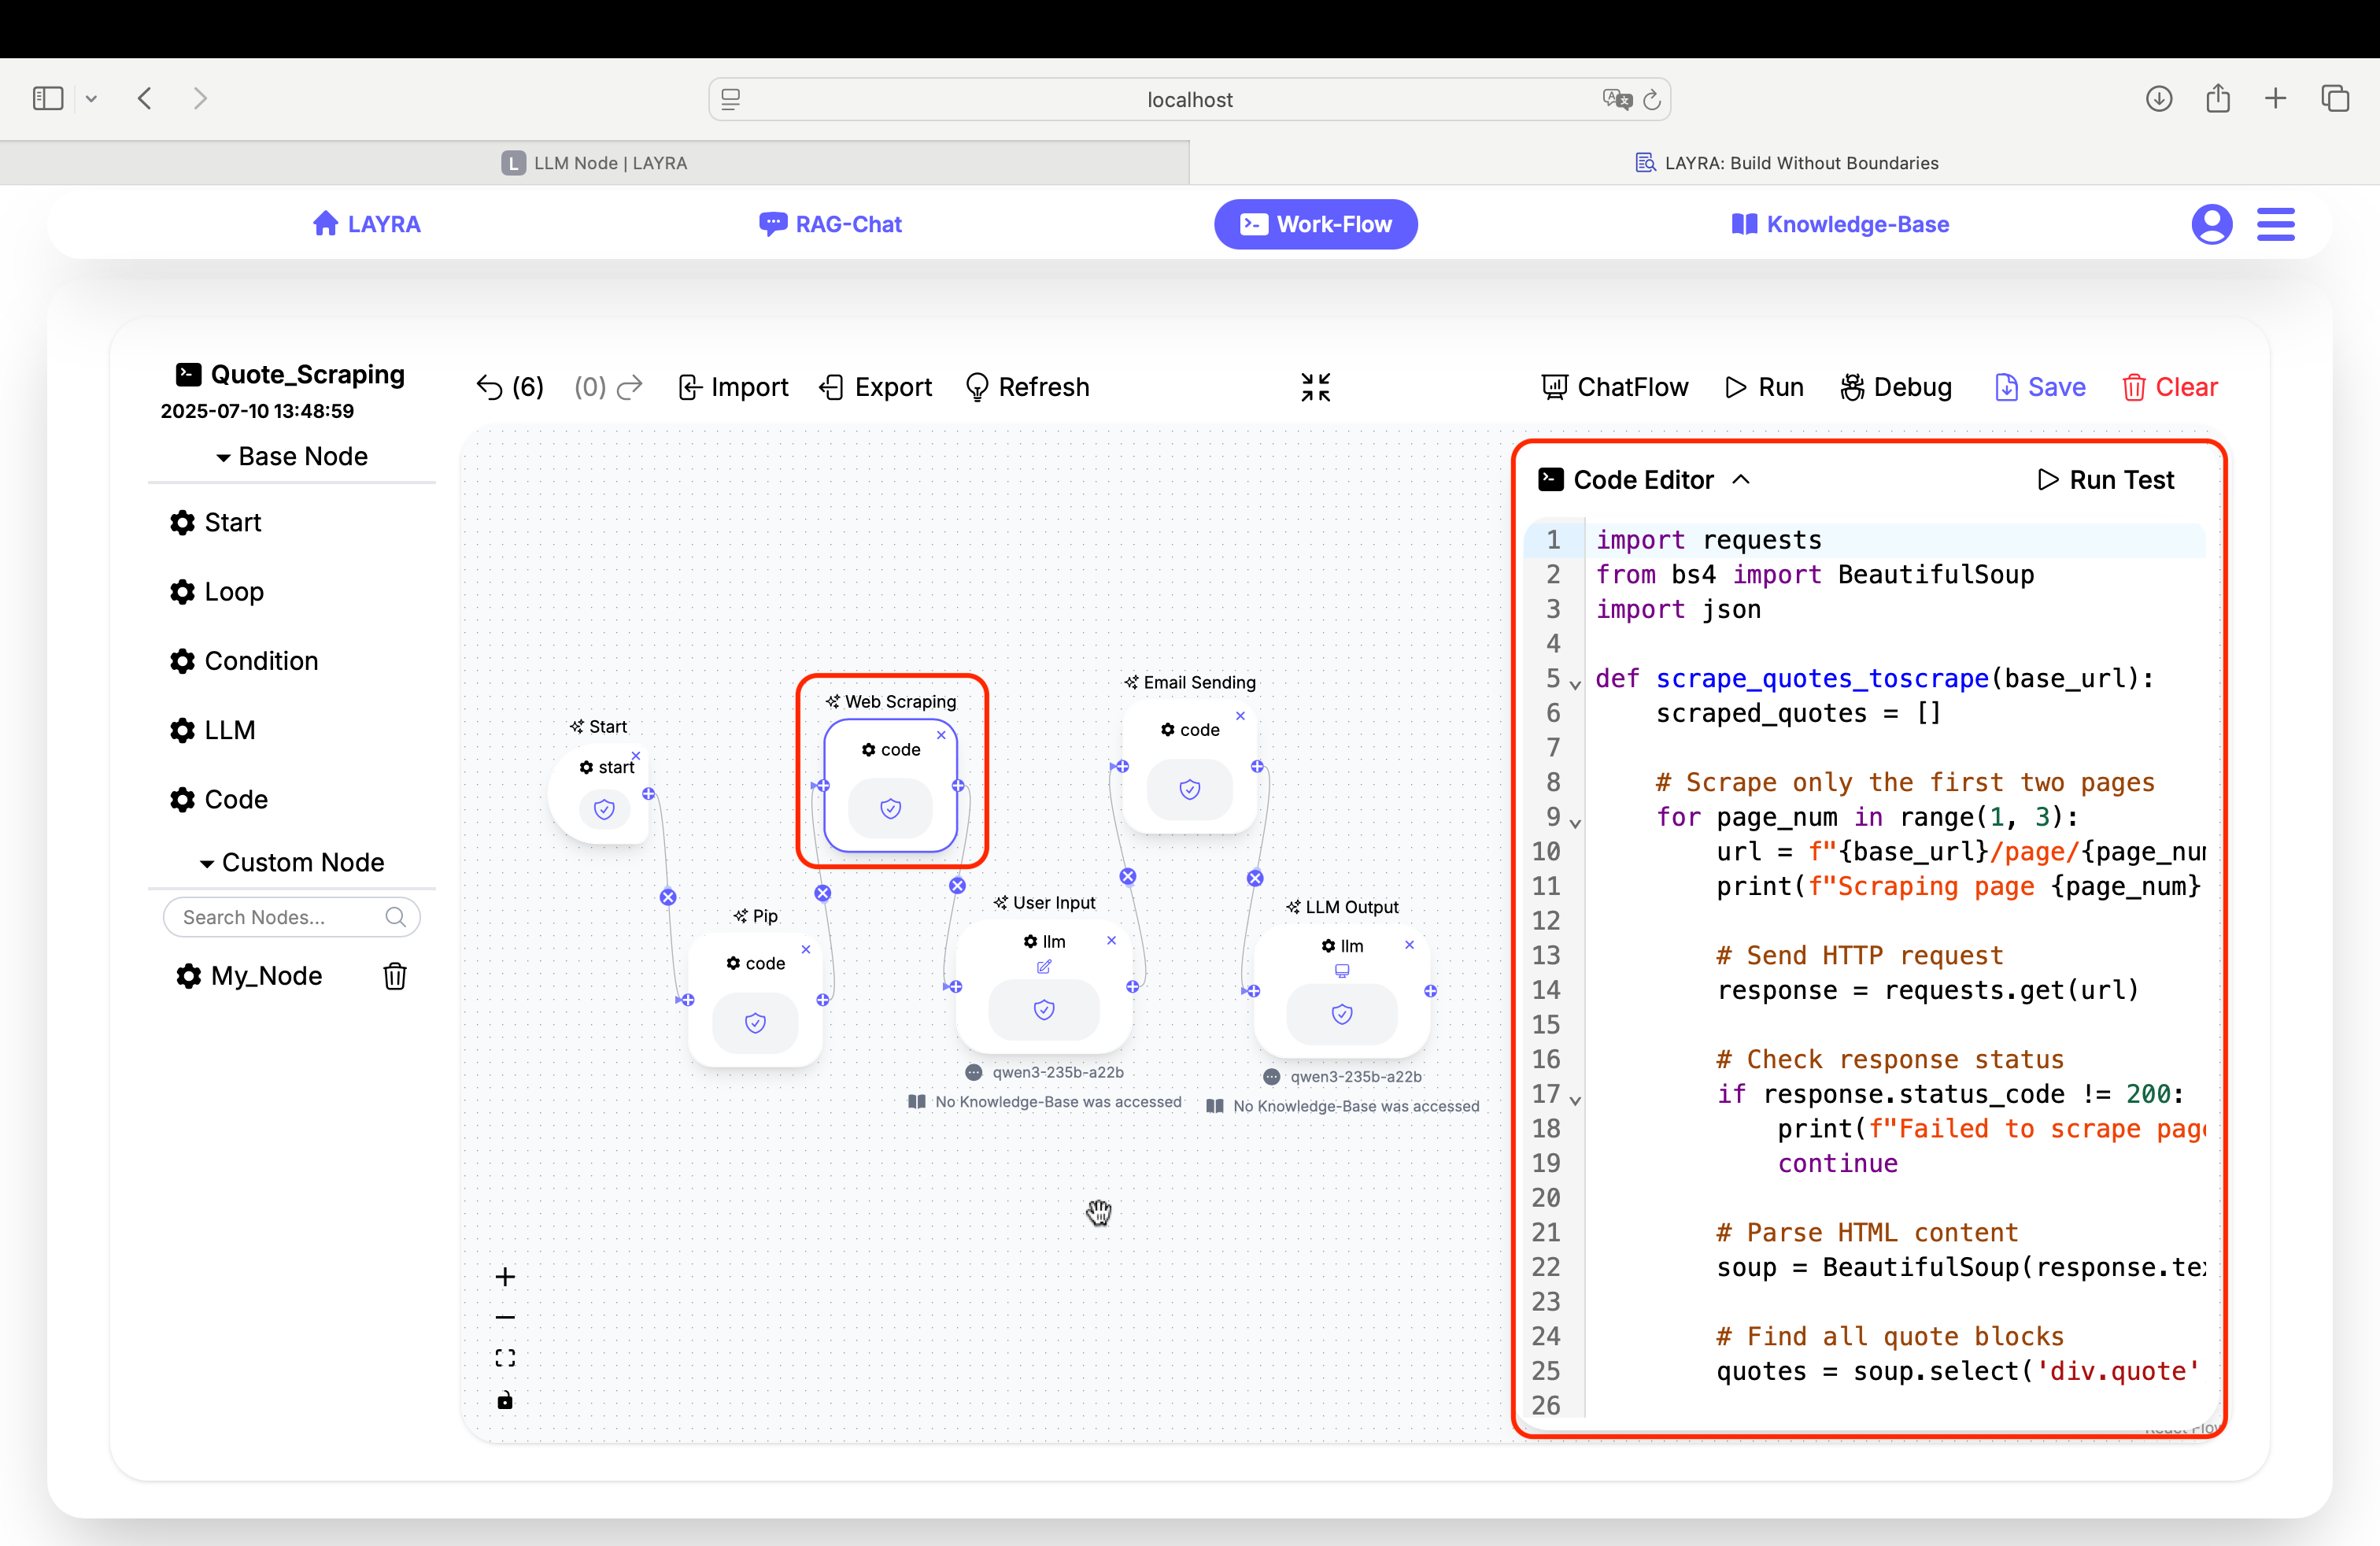
2. Web Scraping Node
Replace the Code Editor content with the following code. This script scrapes only the first two pages, accepts quotes_url as input, and stores the scraped quotes into the quotes variable:
import requests
from bs4 import BeautifulSoup
import json

def scrape_quotes_toscrape(base_url):
    scraped_quotes = []

    # Scrape only the first two pages
    for page_num in range(1, 3):
        url = f"{base_url}/page/{page_num}/"
        print(f"Scraping page {page_num}: {url}  ")

        # Send HTTP request
        response = requests.get(url)

        # Check response status
        if response.status_code != 200:
            print(f"Failed to scrape page {page_num}. Status code: {response.status_code}  ")
            continue

        # Parse HTML content
        soup = BeautifulSoup(response.text, 'html.parser')

        # Find all quote blocks
        quotes = soup.select('div.quote')

        # Extract information from each quote
        for quote in quotes:
            text = quote.select_one('span.text').text.strip()
            author = quote.select_one('small.author').text.strip()
            tags = [tag.text for tag in quote.select('a.tag')]

            scraped_quotes.append({
                'quote': text,
                'author': author,
                'tags': tags,
                'page': page_num
            })

        print(f"Page {page_num} scraped successfully. Found {len(quotes)} quotes\n")

    # Print summary
    print(f"Total quotes scraped: {len(scraped_quotes)}  ")
    return scraped_quotes

# Function execution
quotes_data = scrape_quotes_toscrape(quotes_url)

for i, item in enumerate(quotes_data):
    quotes += f"> {i}. {item['quote']}  \n"
    quotes += f"   - **Author**: {item['author']}  \n"
    quotes += f"   - **Tags**: {', '.join(item['tags'])}  \n"
    quotes += f"   - **Page**: {item['page']}\n  "

# Display sample output
print("\n### Sample quotes:  ")
for i, item in enumerate(quotes_data[:5], 1):
    print(f"> {i}. {item['quote']}  ")
    print(f"   - **Author**: {item['author']}  ")
    print(f"   - **Tags**: {', '.join(item['tags'])}  ")
    print(f"   - **Page**: {item['page']}\n  ")
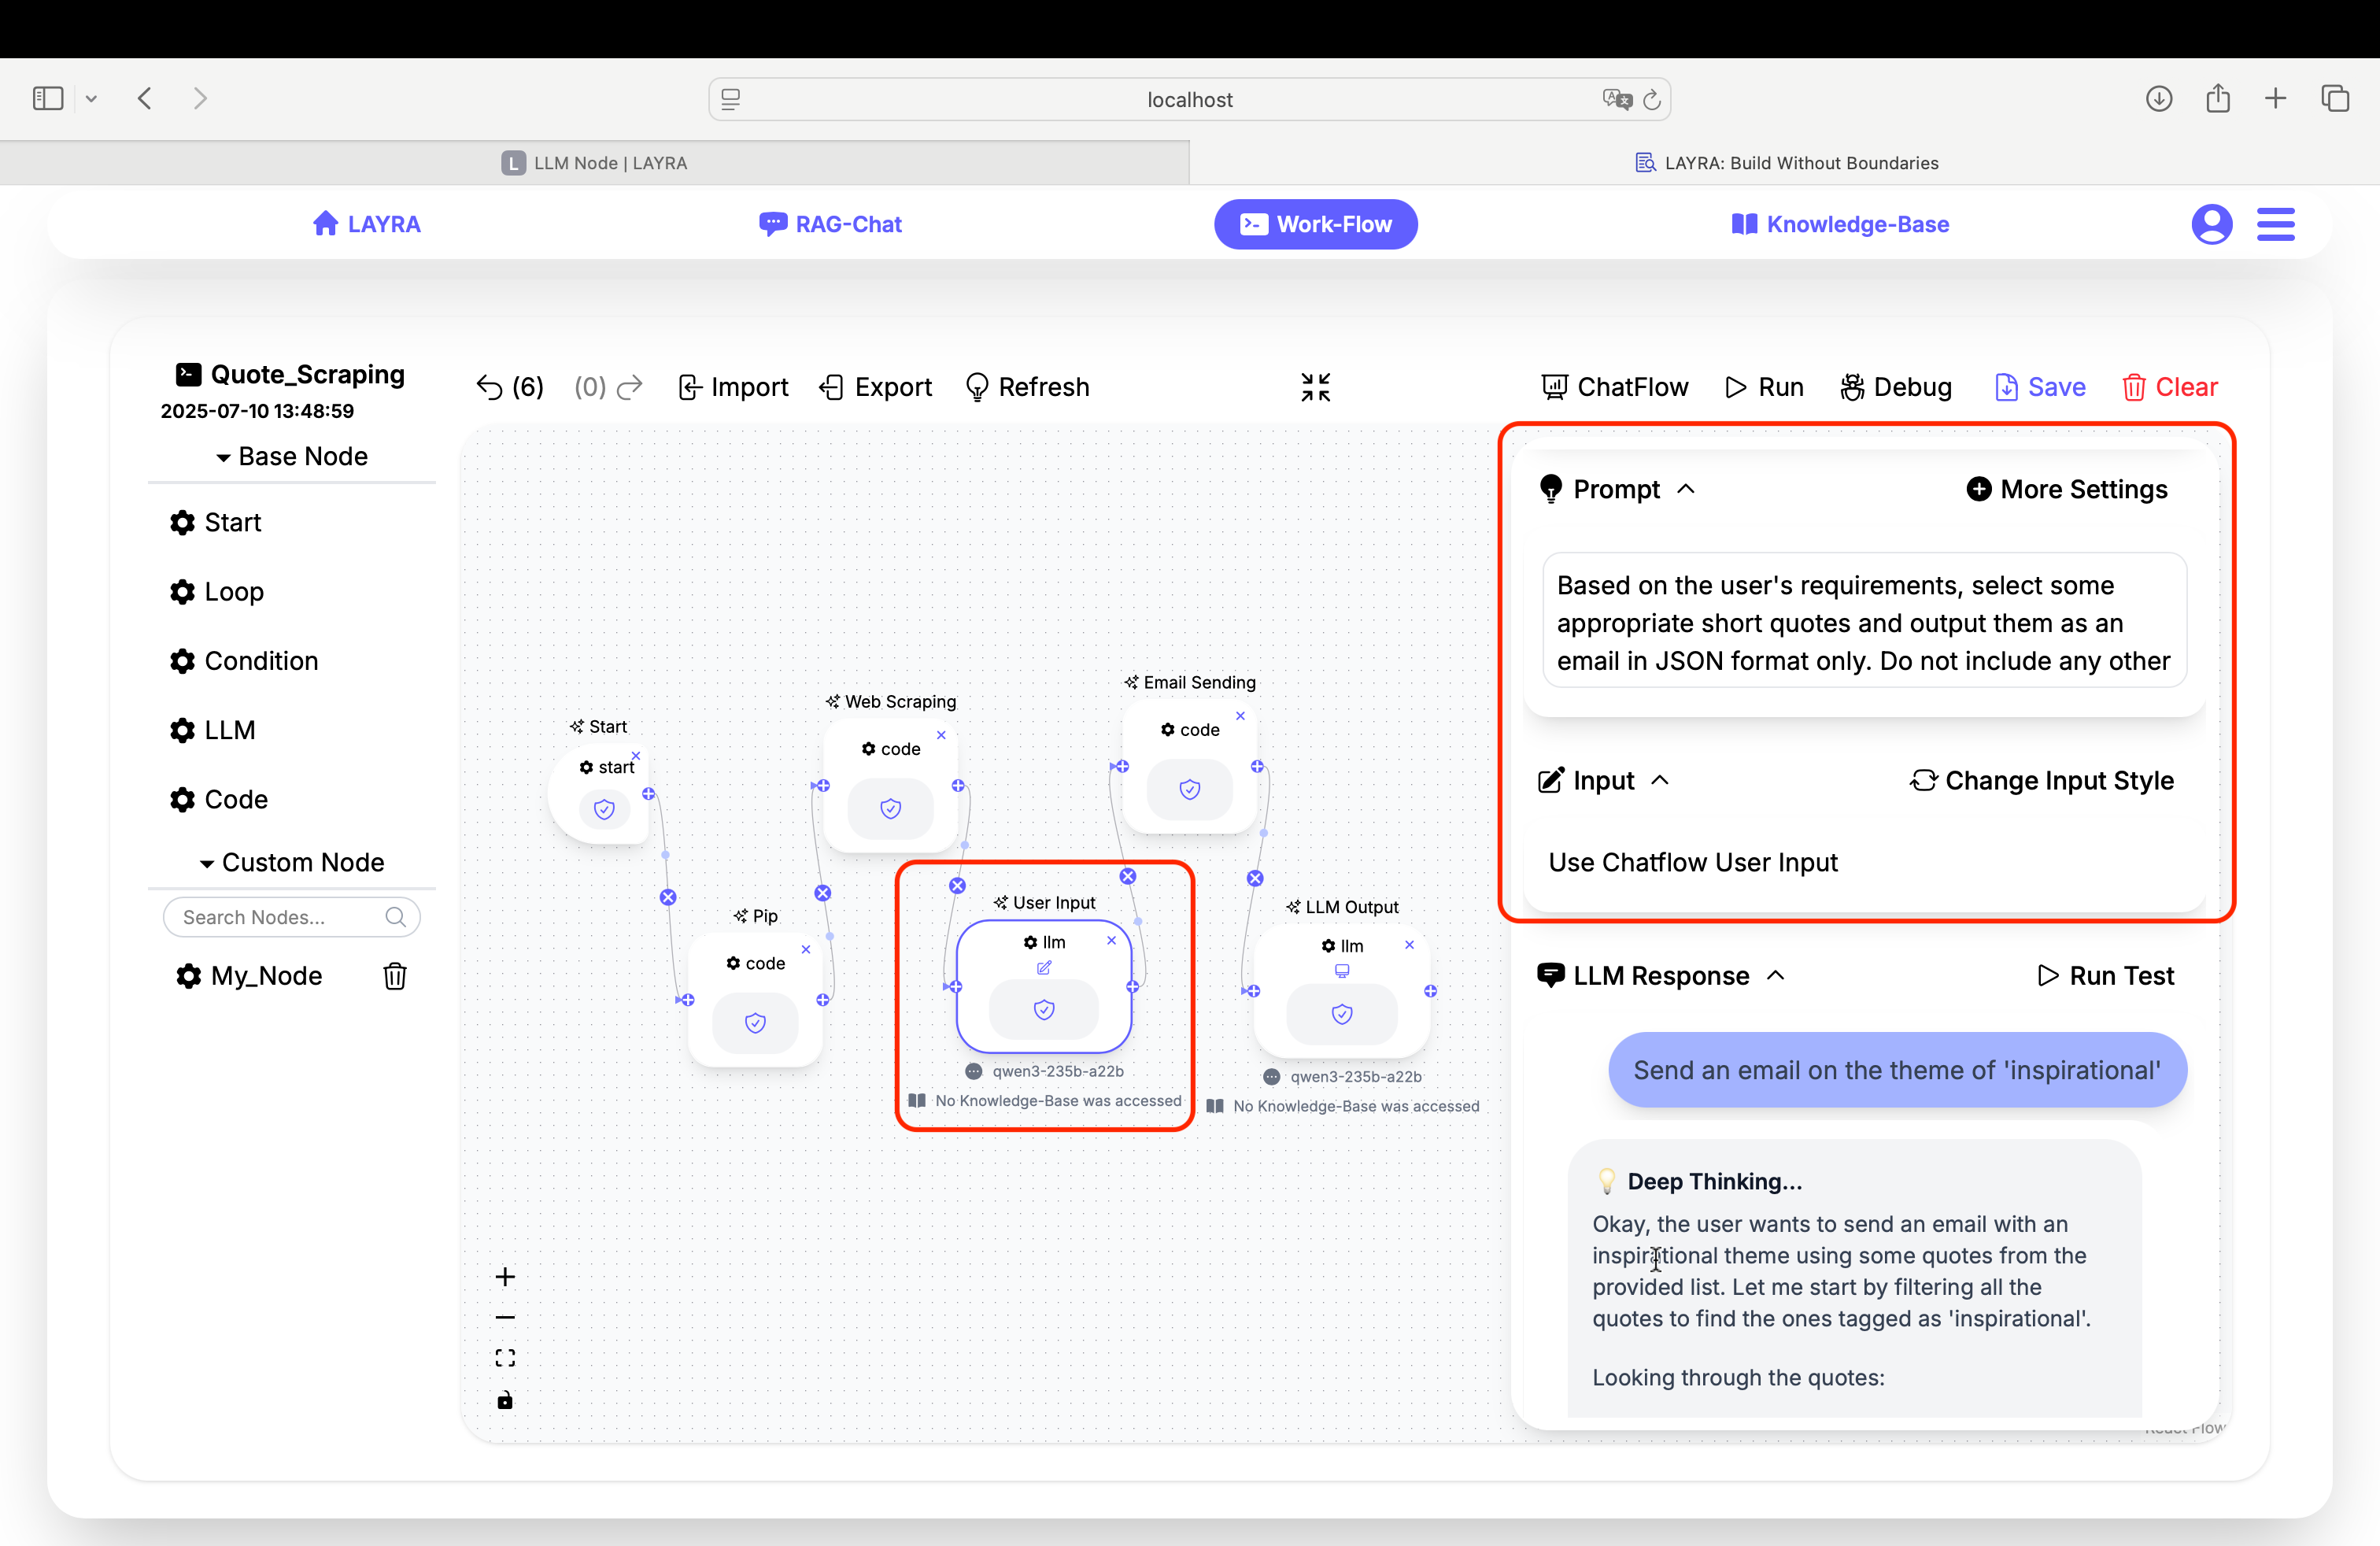
3. User Input & Email Generation Node
Set the LLM prompt to:
Based on the user's requirements, select some appropriate short quotes and output them as an email in JSON format only. Do not include any other information. The output format should be: {"email_subject": email_subject_output, "email_body": email_body_output}. The recipient is: {{recipient_name}}, and the sender is: {{sender_name}}.
 Here are all the quotes information:
{{quotes}}
This ensures the LLM outputs a valid JSON containing email_subject and email_body, which LAYRA will parse and assign to the corresponding Global Variables.
Important: Enable Use Chatflow User Input by checking the Set As Chatflow User Input box to accept user input in this node.
4. Email Sending Node
Replace the Code Editor content with the following code to send the generated email using the specified SMTP server.
Replace the SMTP server address with your own provider. The example below uses Foxmail.
import smtplib, traceback
from email.mime.text import MIMEText
from email.mime.multipart import MIMEMultipart
from email.utils import formatdate

def send_email():
    server = None
    try:
        # ===== Email Content Setup =====
        msg = MIMEMultipart()
        msg['From'] = sender_email  # Replace with sender email
        msg['To'] = recipient_email  # Replace with recipient email
        msg['Subject'] = email_subject  # Updated subject
        msg['Date'] = formatdate(localtime=True)  # Add date header

        # Add email body
        body = MIMEText(email_body, 'plain', 'utf-8')  # Updated content
        msg.attach(body)

        # ===== Establish SSL Connection =====
        server = smtplib.SMTP_SSL('smtp.qq.com', 465)  # Replace with SMTP server
        server.login(sender_email, authorization_code)  # Use authorization code

        # Send email
        server.sendmail(msg['From'], [msg['To']], msg.as_string())
        print("Email sent successfully")

    except Exception as e:
        print(f"Email sending failed: {e}")
        print("Exception traceback:\n", traceback.format_exc())

    finally:
        # Safely close connection, ignore quit errors
        if server:
            try:
                server.quit()  # Attempt graceful quit
            except smtplib.SMTPServerDisconnected:
                # Server already disconnected, no action needed
                pass
            except Exception as e:
                print(f"Non-critical error during connection close: {e}")

# Execute email sending
send_email()
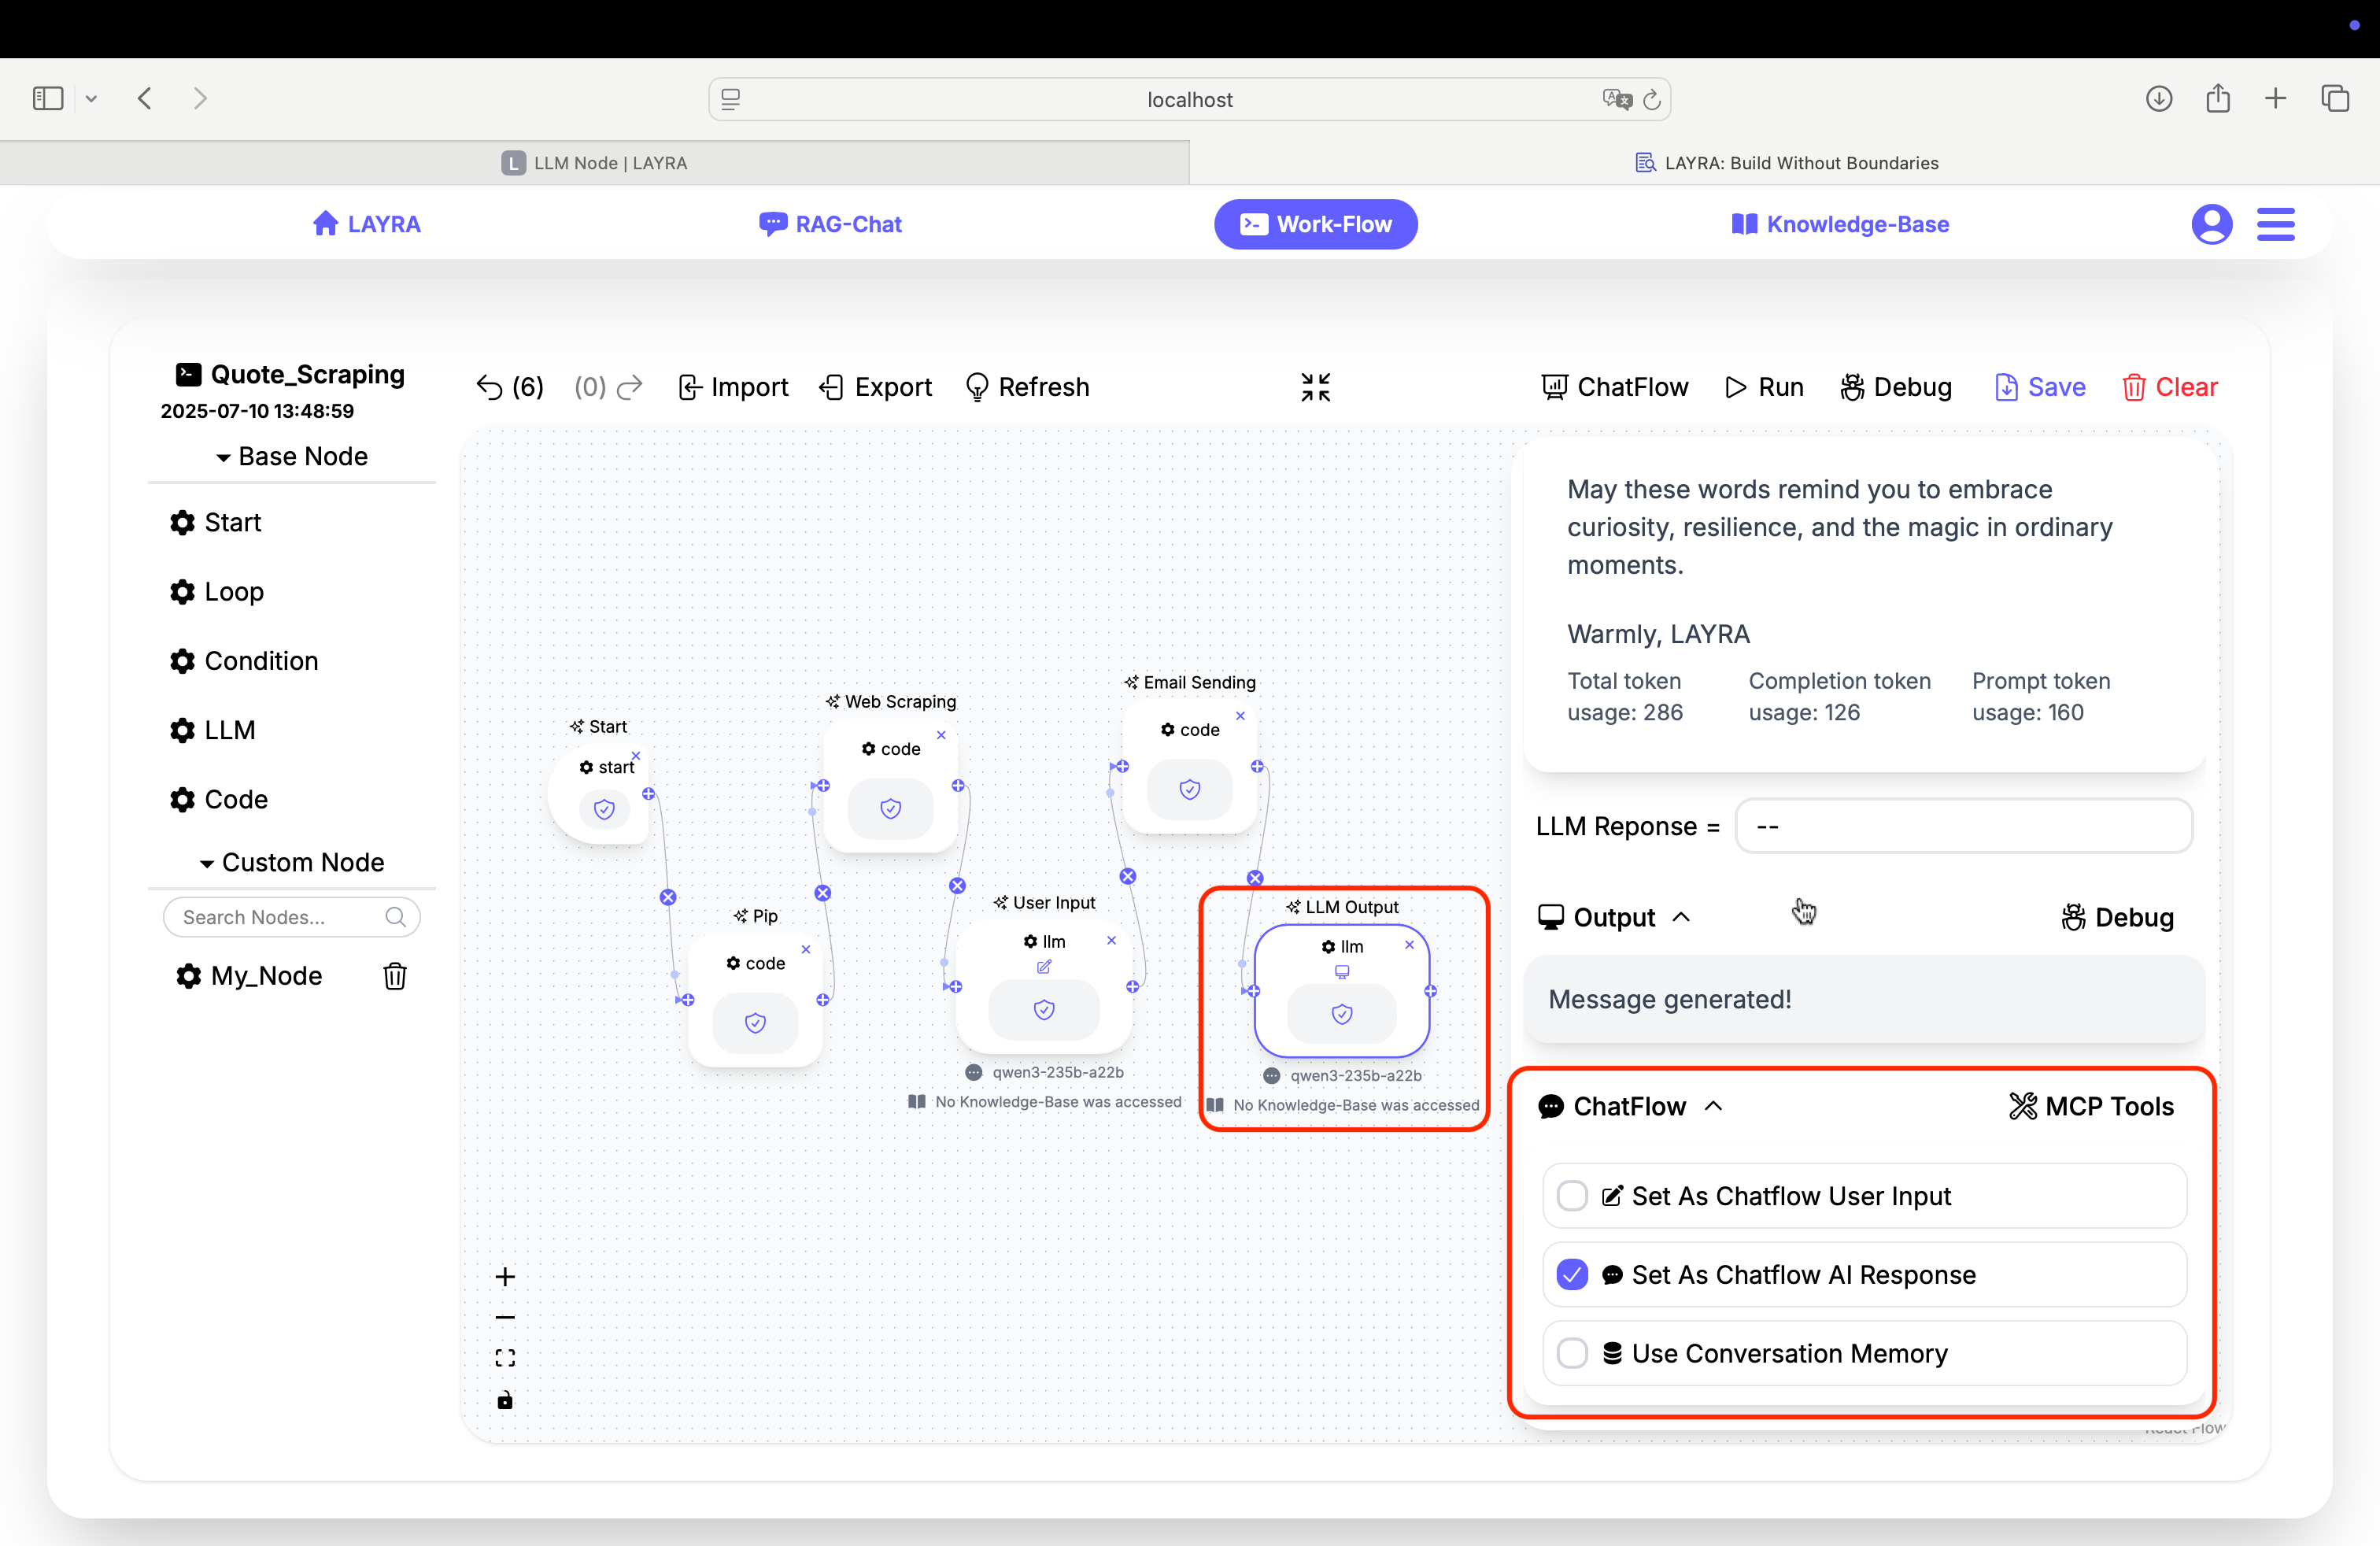
5. LLM Output Node
This final node simply displays the generated email body to the user.
Set Predefined Input to:
Output the following content exactly, without including anything else and without any processing:
{{email_body}}
Ensure Set As Chatflow AI Response is checked so Chatflow displays the email content properly.
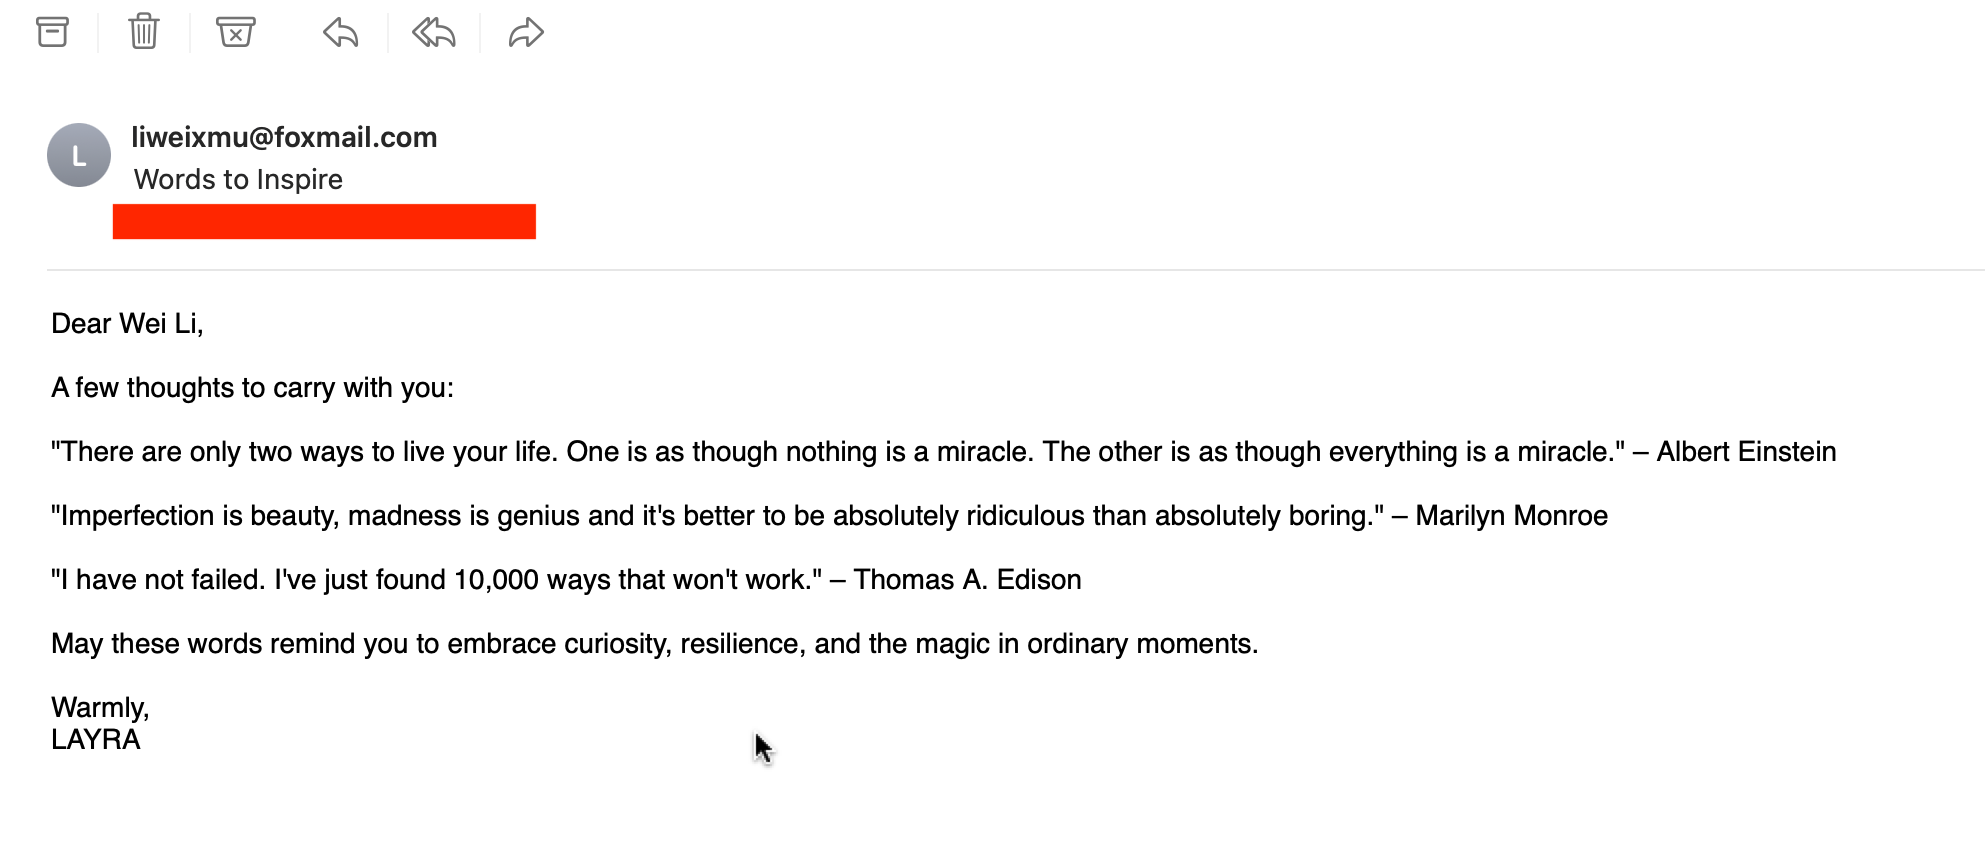
3. Running the Workflow
Now click Run to execute your workflow. In the Chatflow input box, enter a command like:
Send an email on the theme of 'inspirational'
If everything works correctly, your recipient will receive an inspirational email crafted by LAYRA. May these small automations bring you motivation and energy in your daily learning and work.
Next Steps
You have now mastered how to use all node types in your workflows. The final chapter will cover workflow management features including debugging, import/export, and more. You’re almost at the finish line – keep moving forward!
Coming Soon: Explore the Template Gallery for prebuilt automation solutions!